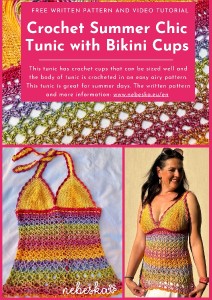
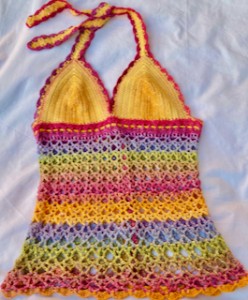
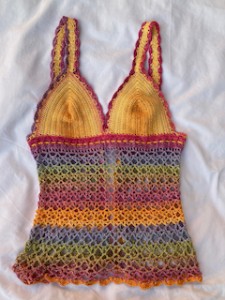
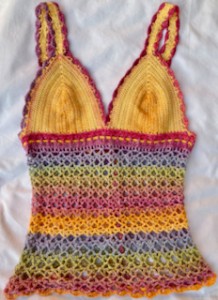
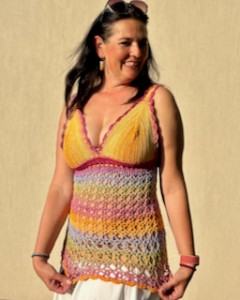
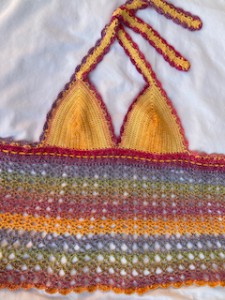
Crochet Summer Chic: Tunic Bora Bora with Bikini Cups
Beautiful summer day my crochet friends!

We are enjoying beautiful, sunny, and truly hot summer days here. It's the perfect time for vacations by the water or the sea. I think it's also the ideal time to crochet a top or tunic with bikini cups and an airy lace pattern. I chose an easy v-stitch pattern for the tunic, featuring a simple cut and construction.
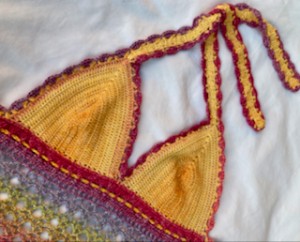
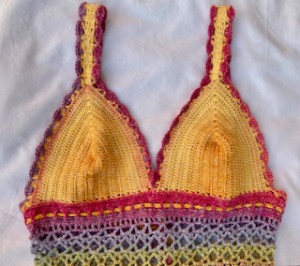
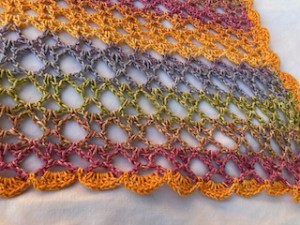
Try this tunic crocheted in a pattern of v-stitch, doble crochets and chain stitches. The tunic is made from several parts: two cups, crocheted from the lower part, the body of the tunic as a rectangle connected to the cups, and finally, a border with fans around the entire tunic.
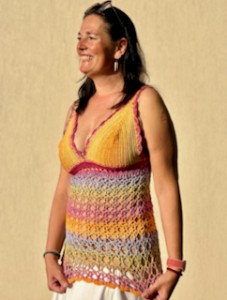
You can make the tunic longer or shorter—I chose a length that reaches over the hips, but you could easily make it longer. I opted to fasten the back with buttons, but you could also use laces or sew the parts together. The straps can be tied around the neck or fastened with buttons on the back panels.
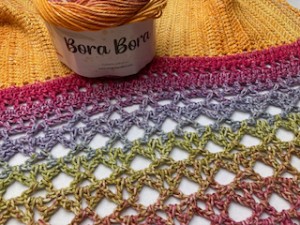
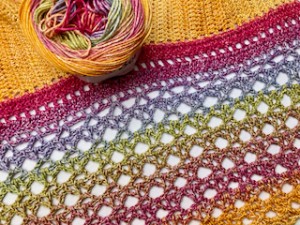
I crocheted with the new Bora Bora yarn, which I bought in a shop in Trieste, and I must say I am very, very happy with it! Bora Bora is a very pleasant, soft yarn, a combination of cotton and bamboo, and it comes in bright summer colors. It's perfect for a summer tunic! I definitely need to buy more next time. :)
Crocheting the lace pattern for the tunic is easy to remember, with only two rows repeated—no complicated counting. It's quick and easy, and you'll love seeing the tunic grow as you work on it.
This tunic is perfect for summer, vacations, and holidays by the water. The great thing is that you can easily adapt it to any size, your taste, and your style. Even a beginner can try it! Doesn't that sound wonderful? Let's start crocheting together!
VIDEO TUTORIAL
You can find the step-by-step video tutorials below which will help you along if you prefer to watch video instruction rather than using a written pattern. Don’t forget to subscribe if you like me videos, it’s FREE!
The FIRST PART
The SECOND PART
![]()
This pattern is made for very beginners and with my video tutorials everyone will manage to crochet this amazing pattern. If you don't understand any of my instructions, don't worry I am here for you - enter the comments at the end of this post.
A huge thanks to everyone who want to support my blog and download PDF paid pattern. Thank you very much, I really appreciate it and it helps me create more new video tutorials and patterns for you. Love you!
![]()
If you pin my patterns to your Favorites and share it on social media as a link, I will be able to share a lot more free crochet patterns for you all.
Stay in touch at Facebook, Instagram and Pinterest.
Let's start or PIN this idea to your Pinterest boards for later.
![]()
If you pin my patterns to your Favorites and share it on social media as a link, I will be able to share a lot more free crochet patterns for you all.
Stay in touch at Facebook, Instagram and Pinterest.
More Crochet patterns?
For even more crochet patterns, check out my e-book.
CROCHET WITH LOVE AND NEBESKA
I prepared for you the e-book CROCHET WITH LOVE AND NEBESKA, it is a set of more than 60 projects with instructions and video instructions for the whole year 2023!
You can download the e-book as a pdf with links to allow you to better find the guide you need. Or maybe you missed one of the pattern instructions and now it will make you happy, or you are just looking for inspiration and one of my ideas will move you in your next creation!
This e-book is FREE and you can share it with your friends. Due to the size, it is necessary to download CROCHET WITH LOVE AND NEBESKA from the link (it cannot be sent as an e-mail attachment). Click on the ebook link or image and download the e-book CROCHET WITH LOVE AND NEBESKA 2023 for FREE.
https://forms.gle/CyJZqXs4fTWechtE6

All of the patterns on that list of beautifully designed, and suitable for both beginners and experienced crocheters. They are different levels of difficulties and techniques that you might have never seen before. Just click on them and you can find the free pattern, each of the patterns comes with a video tutorial.
CROCHET SUMMER CHIC: TUNIC BORA BORA WITH BIKINI CUPS
This pattern is made for beginners - only a basic skill level is required to make it. If you don't understand any of my instructions, don't worry I am here for you.
This TUNIC is perfect for beginners, featuring a V-stitch pattern of double crochets and chain stitches.
All you need is a basic understanding of crocheting, as everything is clearly explained in the step-by-step instructions below and demonstrated in detail in the accompanying video tutorial.
If you have any questions regarding the instructions, don't hesitate to reach out to me. I am here to help!
Have questions? Join the Facebook Group OR my Youtube Community!
I hope this article will be useful for you! If you have any additional questions, feel free to join my Facebook Group or Youtube Community. I created these groups for you to share pictures, ask questions, and help each other out.
CROCHET SUMMER CHIC: TUNIC BORA BORA WITH BIKINI CUPS
So let me now get started and tell you what you will need in order to crochet this CROCHET SUMMER CHIC: TUNIC BORA BORA WITH BIKINI CUPS.
These bikini cups for a summer tunic or summer top with single and double crochets and chains only. They have a simple construction, where we crochet both cups and then we join them together and crochet the border around as one piece all the way around.
The CROCHET SUMMER CHIC: TUNIC BORA BORA WITH BIKINI CUPS has a simple construction, where we crochet both cups and then we join them together and crochet the border around as one piece all the way around. Then we will make a bottom part of the tunic, working in rows, using an easy V-stitch. And as for the body of the tunic - you only remember 2 rows and that's it!
If you want to adjust the size, it's very easy, just change the length of the foundation chain for the cups and the number of rows for the tunic.
Size: woman - BIKINI CUPS MEDIUM SIZE
This can easily be adapted to a smaller size or bigger size just by reducing or increasing the number of chains and rows for the coat and as well as making less or more chains in the basic chain.
The CROCHET SUMMER CHIC: TUNIC BORA BORA WITH BIKINI CUPS is crocheted with premium yarn BORA BORA
Bora Bora: 100g / 280m, 70% Mercerized Egyptian cotton + 30% Bamboo
You will need 2 balls of this beautifully soft and pleasant yarn Bora Bora
Recommended Hook: 3 mm and 5 mm
Stitch markers
Scissors and tapestry needle
Difficulty Level: Level 1 – Easy, for beginners
US crochet terms:
SlSt – slip stitch
CH/s – chain/s
CHSP - chain space
SC - single crochet
DC - double crochet
SK - skip
T - turn
ST/s - stitch(es)
REP - repeat
YO – yarn over
CROCHET SUMMER CHIC: TUNIC BORA BORA WITH BIKINI CUPS
PATTERN NOTES
1) Before you start BIKINI CUPS take a measurement, I would recommend to determine the width of your cups and the hight. Measure the circumference under the breast and hight from the bottom of the breast to the nipple.
If you want to have your cup longer, make a longer foundation chain at the beginning. If you want to have your cup wider, make more rows.
2) This pattern is for C/D cup women size, but you can easily adapt to a smaller size or bigger size just by reducing or increasing the number of chains and rows for the top and as well as making less or more chains in the basic chain.
3) Before you start a TUNIC take a measurement, I would recommend to determine the width of your top. If you want to have your top wider, make a longer foundation chain on sides. If you want to have your top narrower, make a shorter foundation chain on sides.
4) This pattern is for MEDIUM women size, but you can easily adapt to a smaller size or bigger size just by reducing or increasing the number of chains and rows for the top and as well as making less or more chains in the basic chain.
5) A ch1 at beg of the row DOESN'T COUNT as a stitch.
6) A ch3 at beg of the row/round COUNTS as a DOUBLE CROCHET.
7) The TOP measures:
Strap length: 40 cm / 15.6 inch
Strap width: 4 cm / 1.5 inch
Height of shoulder strap on the front: 10 cm / 4 inch
Height of the cup: 21 cm / 8.2 inch
Width of the cup: 21 cm / 8.2 inch
Body of tunic part height: 42 cm / 16.2 inch
Body of tunic width: 44 cm cm / 17.2 inch
Body of tunic width - edge: 55 cm cm / 21.5 inch
*Measurements are taken from the garment lying flat, before the yarn has stretched out/dropped.
8) The TUNIC is worked in 3 basic pieces:
C) BORDER around
CROCHET SUMMER CHIC: TUNIC BORA BORA WITH BIKINI CUPS
THE WRITTEN PATTERN
Work in rows, turn your work when your finish row.
Crochet Hook 3 mm.
Make a slip knot and chain foundation chain.
BIKINI CUP SIZE C/D
Foundation Chain: ch24
Work in rows back and forth
After crocheting the row, we turn the work, crochet ch3 at the beginning of the row.
R1: 1dc in 5th ch from hook, 1dc in next 18st, (2dc + ch1 + 2dc) in last st.
Turn the work and continue crocheting around the opposite side of the chain: 1dc in next 20 st till end of row. In total: 44 dc and ch1: 22 + ch1 + 22. Turn.
R2: ch3 (dc), 1dc in each st till ch1 in the middle, (2dc + ch1 + 2dc) in middle ch1sp, 1dc in each st till end of row. Turn.
In total: 24 + ch1 + 24.
R3 - R11: repeat row R2
Till you are happy with the width and height of the cup. Cut the yarn and fasten off.
Repeat row R2 till you are satisfied with the width and length of your cup, cut the yarn and fasten off. Repeat the instructions for the second cup.
STRAPS
The same hook and the same yarn
Re-join a new yarn.
Work in rows back and forth
A Ch3 at beg = DC
Make 2 straps the same length.
Start on the top of the cup, one stitch from ch1sp: ch3 (1ds), 2dc in ch1sp, 1dc in next st. (4 dc). Turn
R2: ch3 (dc), 1dc in next 3st (4dc), Turn
Repeat row R2 till you are satisfied with the length of your strap, cut the yarn and fasten off.
Repeat the instructions for the second strap.
Cut the yarn, fasten off the loose ends and we're done with STRAPS!
TIME TO JOIN THE CUPS
The same hook and the same yarn
Foundation chain ch45,
Work along the bottom side of the cup: 1sc in corner st, 2sc around each last st, 1sc in corner st (44 sc).
You can work 1or 2 or 3 chains between cups.
Continue crocheting along the bottom side of the second cup: 1sc in corner st, 2sc around each last st, till end of row and 1sc in corner st (44 sc).
Chain a chain ch45,
In total: 45 + 44 + 44 + 45 = 178 stitches
Turn.
WE HAVE PREPARED BEAUTIFULLY SHAPED CUPS! In the next part, we will crochet a body of the tunic with a beautiful V-stitch.
BODY OF THE TUNIC
Work in rows, turn your work when your finish row.
Crochet Hook 3.00 mm
Ch1 at the beg or row doesn’t count as a sc.
Ch3 at beg of row counts as a dc.
R1: ch3 (dc), 1dc in each st and chain. Turn (178 dc)
R2: ch3 (dc), repeat till you reach the middle of the row: ch1, sk 1dc, 1dc in next st. In the middle work: 1dc in dc, ch1, 1dc in next st (don’t sk a dc) neskkakujeme dc, because there is an even number of dc in the previous row and we need an odd number and finish with 1dc to the last dc). Turn
R3: ch3 (1dc), *1dc in chsp, 1dc in dc* repeat from * to * till end of row.
Turn. (179 dc)
R4: ch3 (1dc), 1dc in next dc, *ch1, sk 1dc, 1dc in next st* repeat from * to * till last st, 1dc in last st. We have 88 chain spaces.
For the following pattern, we need the number of chain spaces divisible by 3.
If you have fewer spaces, increase the number of spaces as in row R2: 1dc into dc, ch1, 1dc in next st.
I increased 2 times during the crocheting of the row to have 90 chain spaces.
V-STITCH PATTERN
V-ST = dc + ch3 + dc
R1: ch3 (1dc), 1dc in next st, ch1 *sk ch1sp, (1dc, ch3, 1dc) in next chsp, ch1, sk ch1sp* repeat till end of row, at the end of row work: 1dc in last 2st. Turn. (30 v-sts)
R2: ch1, 1sc in next 2st *ch2, (1dc, ch3, 1dc) in next ch3sp = v-st in v-st, ch2, 1sc in ch1sp between v-st from previous row* repeat till end of row, at the end of row, work: 1sc in last 2st. Turn. (30 v-sts)
R3: ch3 (1dc), 1dc in next st, ch1 *(1dc, ch3, 1dc) in next ch3sp = v-st in v-st, ch1* repeat till end of row, at the end of row, work: 1dc in last 2st. Turn. (30 v-sts)
Repeat row R2 and R3 till you are satisfied with the lenght of your tunic.
I made 25 rows.
I used 5 mm crochet hook for last 9 rows to make a tunic wider.
LAST ROW = BOTTOM EDGE AROUND THE TUNIC
R2: ch1, 1sc in next 2st *ch2, (3dc, ch1, 3dc) in next ch3sp, ch2, 1sc in ch1sp* repeat till end of row, at the end of row, work: 1sc in last 2st. Turn. (30 fans)
BORDER ALONG THE SIDE, ALONG THE CUPS AND STRAPS
Re-join a new yarn in the bottom corner of the side panel
You will finish in the bottom corner of the side panel on the opposite side.
Work on the wrong side.
Work chain spaces: 1sc and ch3
THE IMPORTANT NOTE: the number of chain spaces must be devisible of 2+1 (the odd number of chains)
The width of the chains space is approx. 3 dc / 1cm.
Make sure your chain spaces are made evenly and have the same width.
R1: ch1, 1sc in bottom corner st, work down to top: *ch3, sk 2st (or approx. 1 cm), 1sc in next st* repeat from * to *, till corner (number of chain sps is odd, I made 25 chain sps),
work from right to left along side panel *ch3, sk 2st (or approx. 1 cm), 1sc in next st* repeat from * to *, till corner (number of chain sps is odd, I made 15 chain sps),
Work bottom up, along cup and strap the same way *ch3, sk 2st (or approx. 1 cm), 1sc in next st* repeat from * to * till end of strap. The number of chsps must be odd (I made 47 chain sps).
On the top of strap work = ch3.
Work up to down along strap and cup *ch3, sk 2st (or approx. 1 cm), 1sc in next st* repeat from * to * till middle between CUPS.
Work bottom up along cup and strap the same way *ch3, sk 2st (or approx. 1 cm), 1sc in next st* repeat from * to * till end of strap. The number of chsps must be odd.
On the top of strap work = ch3.
Work up to down along strap and cup *ch3, sk 2st (or approx. 1 cm), 1sc in next st* repeat from * to * till side panel on the opposite side. The number of chsps must be odd and the same as nr on the opposite side.
Work along side panel *ch3, sk 2st (or approx. 1 cm), 1sc in next st* repeat from * to * till upper corner of side panel. The number of chsps must be odd and the same as nr on the opposite side.
Work up to down till bottom corner of side panel *ch3, sk 2st (or approx. 1 cm), 1sc in next st* repeat from * to *, till corner. The number of chsps must be odd and the same as nr on the opposite side.
R2: work on RIGHT SIDE
1sl st in next 2st, ch1, 1sc in 1st chsp, *5dc in next chsp, 1sc in next chsp* repeat from * to * till corner.
Continue: 1sc in 1st chsp, *5dc in next chsp, 1sc in next chsp* repeat from * to * till the cup.
Work bottom up: 1sc in 1st chsp, *5dc in next chsp, 1sc in next chsp* repeat from * to * till end of strap.
Work 5dc on top of strap.
Work up to down: 1sc in 1st chsp, *5dc in next chsp, 1sc in next chsp* repeat from * to * till middle between CUPS.
Work bottom up: 1sc in 1st chsp, *5dc in next chsp, 1sc in next chsp* repeat from * to * till end of strap.
Work 5dc on top of strap.
Work up to down: 1sc in 1st chsp, *5dc in next chsp, 1sc in next chsp* repeat from * to * till side panel.
Work along panel: 1sc in 1st chsp, *5dc in next chsp, 1sc in next chsp* repeat from * to * till corner.
Work along panel top down: 1sc in 1st chsp, *5dc in next chsp, 1sc in next chsp* repeat from * to * till bottom corner on side panel.
Cut the yarn and fasten off.
LACE FOR TYING
We crochet a chain of 3 threads to make it stronger.
It is possible to choose another way of crocheting the string.
Other options can be found, for example, in this video guide:
Crochet the required length according to the circumference under the bust.
Cut the yarn and fasten off.
Pull the string through the chain spaces in the upper part of the tunic - through the R2 row of the body of the tunic.
BUTTON FASTENING
Sew buttons on the wrong side.
The buttons are sewn to the place where you want to attach the straps to the side panel. I sewed on the 3rd row from the top (row of double crochets).
I also sewed buttons on the wrong side of the side panel so that the tunic can be fastened at the back.
It is also possible to crochet a string and tie it on a shoelace.
Cut the yarn and fasten off.
Fasten off your work and hide all loose tails and you are all done with your AMAZING SUMMER TUNIC.
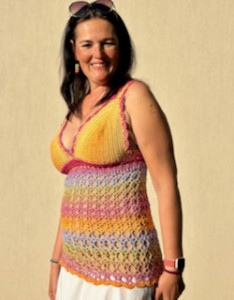
Congratulations on finishing your beautiful summer tunic Bora Bora withe Bikini cups! I hope you have a wonderful summer and enjoy wearing your creation on all your beach adventures and vacations. Happy crocheting and have a fantastic time showing off your stylish new tunic!
What’s Next?
Pin this post: Save this tutorial to your Pinterest boards so that you can come back to it later.
Leave a comment: I love to hear your feedback. Tell me in the comments below!
Share on Instagram and Facebook: When you make this project, share it on social media and tag me @sonanebeska. I love to see what you make!
MORE PATTERNS?
Explore More Crochet Patterns
If you love to crochet as much as I do, I think you’ll love these other free crochet DRESSES and TUNICS patterns ❤️
Do you crochet HATS? You may would like to try these popular video tutorials:
You know me, I love making PONCHOS, VESTS and CARDIGANS.
If you do as well, you may would love to try these patterns as well:
♥♥♥
Have fun and let me know what you make. I would love to know how your project turns out.
Please don't forget to like and I really appreciate your comments.
If the pattern did not make sense to you, please don’t hesitate to contact me, I am happy to help :)
If you like this pattern, please follow and share my projects on social networks as a THANK YOU and to help me to create new projects and patterns for you.
Thank you very much once again for your visit and see you soon!
♥♥♥