T-Shirt Yarn Crocheted Basket and a Lid with a Bunny Picture
Hey everyone!
Welcome to my Blog! Your support is what directly allows me to keep creating more free video tutorials and patterns for our amazing crochet community!
Want to contribute? Here are three ways you can show your support:
-
Tip me: https://paypal.me/nebeskacrochetlove
-
Buy patterns: https://payhip.com/NebeskaCrochetwithLove
- Become a Patron and unlock even more content: https://herohero.co/crochetwithlove
Thanks a million, my crochet friends! Wishing you joy and color through yarn.
I truly believe in the magic of creativity.
-------------------------------------------------------
Spring is the perfect time to refresh your home! How about crocheting a stylish basket that's not only a beautiful decoration but also a practical helper? Imagine storing small items, treats, or even your favorite crochet supplies in it.
Want to make yourself or your loved ones happy? A handmade basket is a wonderful gift that will delight everyone.
New tutorial, new possibilities!
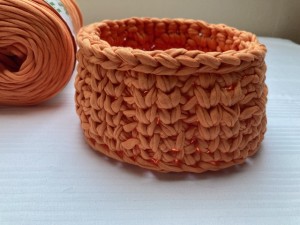
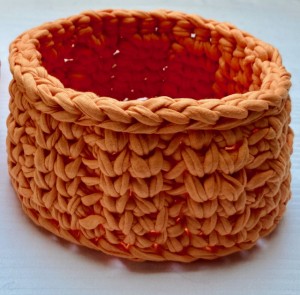
I'm introducing a tutorial for a basket made from Spagitolli t-shirt yarn with an interesting pattern of alternating knit stitch columns. The basket is easy to adjust to various sizes, allowing you to crochet a whole set of differently sized baskets.
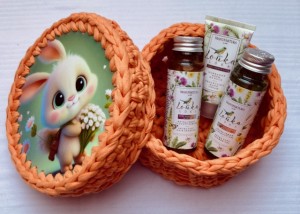
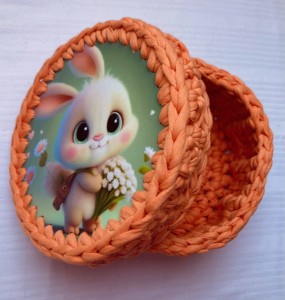
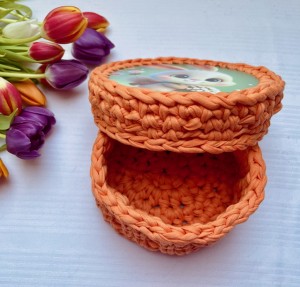
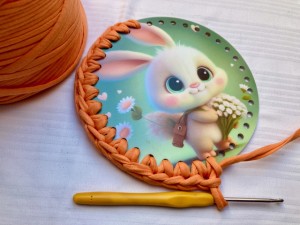
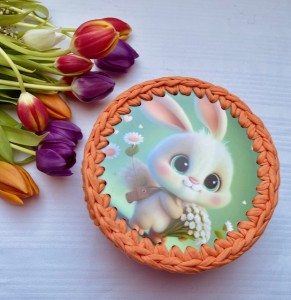
For this basket, I crocheted a lid – the base of the lid is a plastic lid with a cheerful bunny picture. I crocheted around the lid with the same yarn and the same pattern I used for the basket.
You'll have a beautiful set – a basket with a lid or two baskets, one classic and one with a plastic base.
It's fun crocheting that you can manage in multiple sizes – ideal for a whole set! And what about the lid with an adorable bunny or other cheerful pictures? The basket immediately gains that special charm!
Inspiration at every step!
In my collection, you'll find plenty of other basket tutorials – from mini baskets to square pieces. And don't worry, even beginners will find something to their liking!
More baskets? Find the playlist „HOME DECORATIONS“ on my YouTube Channel.
https://youtube.com/playlist?list=PLgX-CoVfCjlOUidoRGm7jwW6ZrA_gPDwS
Or visit a chapter „HOME DECORATIONS“ on my blog.
Worried about crocheting a straight base?
Try baskets with a wooden base or lid – easy and effective!
Why crochet baskets?
-
Practical and stylish storage solutions
-
Ideal for organizing your home
-
Great gift for any occasion
-
Fun and relaxing way to create
Can you already picture yourself crocheting your new favorite basket? With my tutorials, you can do it with ease!
Wishing you pleasant crocheting and lots of joy from creating!
The pattern is available here below for free. It comes with a video guide as well.
Let’s get started to make this perfect pattern!
DETAILED WRITTEN PATTERN (PAID PDF DOWNLOAD)
First 10 purchases get a special 10% discount! Use code: 3GZC82JEA2
VIDEO TUTORIAL
You can find the step-by-step video tutorials below which will help you along if you prefer to watch video instruction rather than using a written pattern. Don’t forget to subscribe if you like me videos, it’s FREE!
If you pin my patterns to your Favorites and share it on social media as a link, I will be able to share a lot more free crochet patterns for you all.
Stay in touch at Facebook, Instagram and Pinterest.
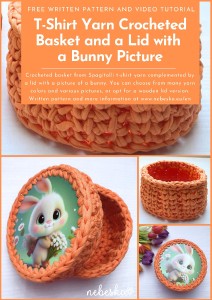
Let's start or PIN this idea to your Pinterest boards for later.

For even more crochet patterns, check out my e-book.
More pattern? CROCHET WITH LOVE AND NEBESKA
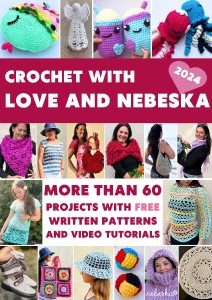
I'm thrilled to present my 2024 e-book, CROCHET WITH LOVE AND NEBESKA!
Inside, you'll discover over 60 projects with patterns and video tutorials to inspire you all year long.
You can download the e-book as a PDF, complete with clickable links to easily find the patterns you're looking for. Perhaps you missed a pattern and are now happy to find it here.
Or maybe you're just looking for inspiration for your next project – I hope my ideas spark your creativity! The e-book is FREE and you can share it with your friends.
Due to its size, the e-book is available for download only via the link below (it cannot be sent as an email attachment). Click the link image below to download the CROCHET WITH LOVE AND NEBESKA 2024 and 2023 e-books for FREE!
Have questions? Join the Facebook Group!
I hope this article will be useful for you! If you have any additional questions, feel free to join my Facebook Group. I created this group for you to share pictures, ask questions, and help each other out.
CROCHETED BASKET FROM T-SHIRT YARN AND LID WITH A CHEERFUL PICTURE INSTRUCTIONS AND RECOMMENDATIONS FOR THE TUTORIAL
This basket is designed for more experienced beginners, we crochet a pattern using half double and single crochet stitches, we'll play with relief stitch patterns and crocheting through the back loop. You can also play with different basket sizes and color variations.
MATERIAL
Crocheted baskets are a beautiful and useful item for the home, great as decorations too. You can have this basket with a lid finished in no time.
What will we need?
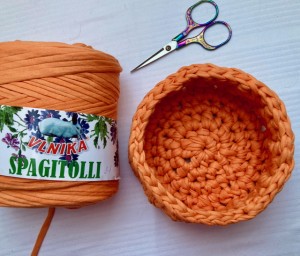
Yarn - I chose t-shirt yarn, which is suitable not only for baskets but also for other crocheted home decorations.
Recommended yarn: Spagitolli
Ball: 700 g / 120 m / 80 % cotton + 5 % lycra + 15 % polyester Base - lid plastic circle 15 cm/5 mm
Plastic lid, suitable for making baskets from, for example, string yarns. Holes: cut round 5 mm. Printed on both sides.
Hook: 7mm and 2.5 mm or another size suitable for the chosen yarn
Sewing and embroidery needle
Stitch marker
Scissors
CROCHET BASKETS WITH BRAIDED PATTERN
Difficulty Level: Level 1 – Easy, for beginners
US crochet terms:
SlSt – slip stitch
CH/s – chain/s
SC - single crochet
CSSC - Single crochet into the center of the single
HDC - half double crochet
SK - skip
T - turn
ST/s - stitch(es)
REP – repeat
RS = Right side
WS = Wrong side
JOIN = Join
This pattern requires familiarity with stitches used and using invisible join when you work in closed rounds.
Special techniques:
- Back loop only crocheting
- Single crochet into the center
The "single crochet into the center" technique, sometimes referred to as the "waistcoat stitch," creates a dense, knit-like fabric. Here's a step-by-step explanation:
Understanding the Basics:
- Normally, when you single crochet (SC), you insert your hook under the two top loops of the stitch in the row below.
- The "single crochet into the center" changes where you insert your hook.
Step-by-Step Guide:
-
Locate the "V":
- After you've crocheted a row of single crochets, you'll see a series of "V" shapes.
- These "V"s are formed by the top of each single crochet stitch.
- Instead of going under the top loops, you'll be going into the center of this "V."
-
Insert the Hook:
- Insert your crochet hook directly into the center of the "V" shape, between the two "legs" of the "V."
- You'll be going underneath the horizontal bar that lies behind the "V."
-
Yarn Over:
- Yarn over your hook.
-
Pull Up a Loop:
- Pull up a loop of yarn through the center of the "V." You should now have two loops on your hook.
-
Yarn Over and Finish:
- Yarn over your hook again.
- Pull the yarn through both loops on your hook. This completes the single crochet stitch.
Important Considerations:
- Tension:
- This stitch can be tight. It's often recommended to use a slightly larger hook than you normally would to make it easier to work.
- Try to keep your tension relatively loose.
- Appearance:
- This stitch creates a very dense and firm fabric, with a distinctive "knit-like" appearance.
- Working in Rounds:
- When working in rounds, you will continually work into the "V" of the stitches from the previous round.
- Checking your work:
- It's a good idea to check your work as you go, to make sure that the "V"s of the new stitches are lining up with the "V"s of the stitches below.
CROCHETED BASKET FROM T-SHIRT YARN AND LID WITH A CHEERFUL PICTURE
PATTERN NOTES
- In the tutorial, the 1 chain stitch at the beginning of the row does not serve as a replacement for a stitch.
- I recommend starting with a magic ring.
- The basket is crocheted in both spiral and closed rounds - both techniques are shown in detail in the video tutorial, and an "invisible" join is chosen for connecting the rounds, where we sew the round with the tail end of the yarn.
- The inner part is crocheted with single crochet stitches in spiral rounds, I recommend using a stitch marker to mark the beginning of the round.
- ( ) – the number in parentheses indicates the number of stitches in the row after crocheting the entire row.
- Basket size:
- height: 10 cm
- width: 15 cm
- Lid size:
- height: 4 cm
- width: 15 cm
- The size may vary depending on the crocheting style and yarn tension.
- You can crochet the basket as wide and high as you want, just change the number of rows on the bottom part and the walls of the basket.
- Lid dimensions according to the selected dimension of the lid type you choose.
CROCHETED BASKET FROM T-SHIRT YARN AND LID WITH A CHEERFUL PICTURE
DETAILED WRITTEN PATTERN (PAID PDF DOWNLOAD)
First 10 purchases get a special 10% discount! Use code: 3GZC82JEA2
BASKET
BOTTOM PART Color A
7 mm hook
1 chain stitch at the beginning of the row does not serve as a replacement for a stitch.
We start with a magic ring and continue crocheting in closed rounds – we close the round with a slip stitch. We crochet on the right side, do not turn the work.
R1: ch1, 9 hdc into the magic ring, close the round with a slip stitch (9 hdc)
R2: ch1, 2 hdc into each stitch around until the end of the round, close the round with a slip stitch (18 hdc)
R3: ch1, 1 hdc into the next stitch, 2 hdc into the next stitch repeat from * to * until the end of the round, close the round with a slip stitch (24 hdc)
R4: ch1, 1 hdc into the next 2 stitches, 2 hdc nto the next stitch repeat from * to * until the end of the round, close the round with a slip stitch (36 hdc)
Finish the round with an invisible join - I recommend pulling the tail from the beginning when we crocheted the magic ring and using this tail to sew the invisible join.
Continue crocheting the body of the basket.
BASKET BODY
Crochet on the right side, do not turn the work.
Crochet in spiral rounds, do not close the round with a slip stitch.
Crochet single crochet stitches into the center of the single crochet stitch from the previous round and single crochet stitches into the back loop.
R1: ch1, 1 sc into each stitch BLO, (36 sc)
R2: ch1, 1 cssc into the next 2 stitches, 1 sc BLO into the next stitch. The "knit pattern" separated by single crochet beautifully stands out.
R3 – R6: repeat row R2
Last round: 1 slip stitch into each stitch around, finish with an invisible join.
Cut the yarn and weave in the loose end.
BASKET WITH PLASTIC BASE OR LID
Color A
2.5 mm and 7 mm hooks
1 chain stitch at the beginning of the row does not serve as a replacement for a stitch.
Crochet on the right side, do not turn the work.
Crochet in spiral rounds, do not close the round with a slip stitch.
Crochet single crochet stitches into the center of the single crochet stitch from the previous round and single crochet stitches into the back loop.
2.5 mm hook
R1: crochet single crochet stitches into the holes in the wooden base.
1 single crochet into each hole, join the round with an invisible join, finish the last single crochet with the tail end of the yarn.
R2: ch1, crochet single crochet stitches – 1 single crochet into each stitch through the third loop (the bump).
7 mm hook
R3: ch1, 1 cssc into the next 2 stitches, 1 sc BLO into the next stitch.
The same pattern as on the body of the basket: "knit pattern" separated by single crochet.
R4: repeat row R3
Last round: 1 slip stitch into each stitch around, finish with an invisible join.
Cut the yarn and weave in the loose end.
The basket with a lid or basket with a wooden base can be decorated according to taste - for example, with a heart for joy, a crocheted flower, a button, a bow, and so on.
This cute CROCHET BASKET would a perfect handmade gift for all - for kids and adults! Could be a perfect gift for your love ones.
I hope you’ve enjoyed making this free CROCHET pattern.
What’s Next?
Pin this post: Save this tutorial to your Pinterest boards so that you can come back to it later.
Leave a comment: I love to hear your feedback. Tell me in the comments below!
Share on Instagram and Facebook: When you make this project, share it on social media and tag me @sonanebeska. I love to see what you make!
You can browse through all of my other FREE crochet HOME and DECO patterns:
https://www.nebeska.eu/en/articles/crochet-patterns-and-tutorials/home-decoration-and-holidays/
You know me, I love making homemade things and creating beautiful gifts for my family and my friends. I also love to make HOME DECORATIONS so much. If you do as well, you may would love to try these patterns as well:
Explore More Crochet Patterns
If you love to crochet as much as I do, I think you’ll love these other free crochet patterns. ❤️
Show your love any day of the year and make lovely and sweet little things for your loved ones:
♥♥♥
Have fun and let me know what you make. I would love to know how your project turns out.
Please don't forget to like and I really appreciate your comments.
If the pattern did not make sense to you, please don’t hesitate to contact me, I am happy to help :)
If you like this pattern, please follow and share my projects on social networks as a THANK YOU and to help me to create new projects and patterns for you.
Thank you very much once again for your visit and see you soon!
♥♥♥
