Lacy Crochet Bell A Perfect Beginner-Friendly Project!
Hello My Crochet Friends!
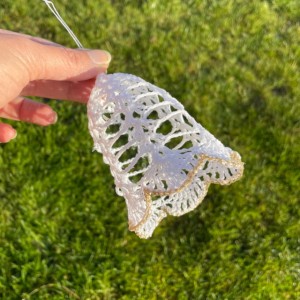
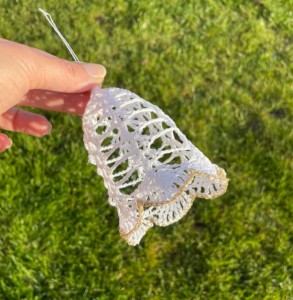
Today is the grand finale of our series of lace crochet Christmas decorations made with Violka yarn – we’re making a gorgeous crocheted bell! I’ve named it the "First Crochet Bell" because it’s super easy, quick, and you can customize it to your taste – make it smaller, bigger, wider, or narrower, just the way you like it!
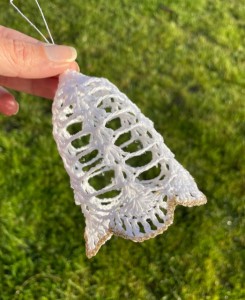
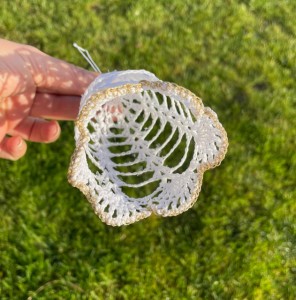
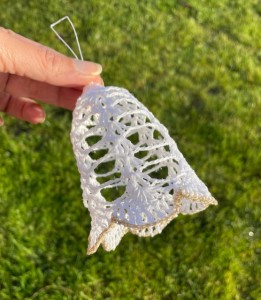
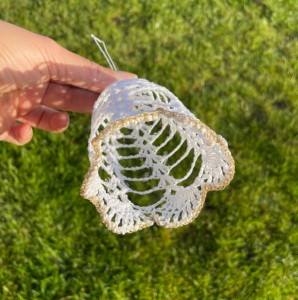
Even complete beginners can handle this bell. Its delicate and romantic white design is perfect for adding a festive touch to your home. Plus, I’ve used the same pattern as the angel’s dress, so these two decorations beautifully complement each other. To make it even more special, I added a touch of gold thread around the edge – giving it a luxurious, sparkling finish!
Just like the other crocheted ornaments, this bell is ideal for Christmas. It can adorn your tree, an Advent wreath, or become part of a holiday centerpiece.
The pattern is beginner-friendly, requiring only basic skills like double crochet stitches and chains. It’s worked in closed circular rows, and the pattern repeats beautifully – perfect for relaxing! I’ve also prepared a detailed video tutorial to guide you step by step, making it easy for less experienced crocheters to join in.
I believe this Christmas bell, alongside the other lace decorations, will bring a magical touch to your holidays and brighten your festive moments.
Have fun!
You can find the step-by-step video tutorials below which will help you along if you prefer to watch video instruction rather than using a written pattern.
Don’t forget to subscribe if you like me videos, it’s FREE!
Feel free to write a comment below the video! I look forward to all your notes!
This pattern is made for beginners - only a basic skill level is required to make it. If you don't understand any of my instructions, don't worry I am here for you - enter the comments at the end of this post.
A huge thanks to everyone who want to support my blog and download PDF paid pattern. Thank you very much, I really appreciate it and it helps me create more new video tutorials and patterns for you. Love you!
If you pin my patterns to your Favorites and share it on social media as a link, I will be able to share a lot more free crochet patterns for you all.
Stay in touch at Facebook, Instagram and Pinterest.
Let's start or PIN this idea to your Pinterest boards for later.

More Crochet patterns?
For even more crochet patterns, check out my e-book.
CROCHET WITH LOVE AND NEBESKA
I prepared for you the e-book CROCHET WITH LOVE AND NEBESKA, it is a set of more than 60 projects with instructions and video instructions for the whole year 2023!
You can download the e-book as a pdf with links to allow you to better find the guide you need. Or maybe you missed one of the pattern instructions and now it will make you happy, or you are just looking for inspiration and one of my ideas will move you in your next creation!
This e-book is FREE and you can share it with your friends. Due to the size, it is necessary to download CROCHET WITH LOVE AND NEBESKA from the link (it cannot be sent as an e-mail attachment). Click on the ebook link or image and download the e-book CROCHET WITH LOVE AND NEBESKA 2023 for FREE.
https://forms.gle/CyJZqXs4fTWechtE6
All of the patterns on that list of beautifully designed, and suitable for both beginners and experienced crocheters. They are different levels of difficulties and techniques that you might have never seen before. Just click on them and you can find the free pattern, each of the patterns comes with a video tutorial.
This pattern is made for beginners - only a basic skill level is required to make it. If you don't understand any of my instructions, don't worry I am here for you.
Have questions? Join the Facebook Group OR my Youtube Community!
I hope this article will be useful for you! If you have any additional questions, feel free to join my Facebook Group or Youtube Community. I created these groups for you to share pictures, ask questions, and help each other out.
CROCHET CHRISTMAS BELL
MATERIALS AND DIRECTIONS:
This CROCHET CHRISTMAS BELL is very easy and super quick crochet project, you just need to know how to crochet double crochet stitch and how to chain.
So let me now get started and tell you what you will need in order to crochet this LITTLE CROCHET CHRISTMAS BELL
Violka:
Ball: 50g, 285 m, 100 % cotton
https://vlnika.cz/z25763-prize-violka
For the endings: Metallic Cone
Ball: 100g, 1000 m, 100 % lurex
https://www.vlnika.cz/z22128-prize-metallic-cone
For this pattern you will need 2.5 mm crochet hook.
Scissors
Sewing/Embroidery and yarn needle/tapestry needle for sewing pieces together and weaving in ends
Markers
CROCHET CHRISTMAS BELL
Difficulty Level: Level 1 – Easy, for beginners
US crochet terms:
SlSt – slip stitch
CH/s – chain/s
SC - single crochet
DS - double crochet
SK - skip
T - turn
ST/s - stitch(es)
REP – repeat
CROCHET CHRISTMAS BELL – INSTRUCTIONS AND NOTES
1) In the pattern, ch1 at the beginning of a row does not count as a stitch.
2) In the pattern, ch3 at the beginning of a row counts as a DOUBLE crochet stitch.
3) I recommend starting with a magic ring.
4) Bell Size: Approximately 11 cm tall and 7 cm wide.
5) If you’d like the BELL to be a smaller or larger figure, simply use a smaller or larger hook and adjust the yarn size.
HOW TO CROCHET CHRISTMAS BELL
WRITTEN PATTERN
Crochet Hook 2.5 mm
Color A
Make a magic ring. At the beginning, keep the longer end, which you can then use as a loop/eyelet for hanging.
R1: ch3 (dc), 11 dc in mr, close round with a sl st in 3rd ch from beg
R2: ch3 (dc), ch1, *1dc in next st, ch1* repeat from * to * till end of row, close round with a sl st in 3rd ch from beg
R3: ch3 (dc), 1dc in 1st st, ch1, *2dc in next st, ch1* repeat from * to * till end of row, close round with a sl st in 3rd ch from beg
V-stitch = (2dc, ch1, 2dc) in chsp
R4: sl st in next 2 st to move in 1st chsp, (ch3 (dc), 1dc, ch1, 2 dc) in chsp, ch1, skip chsp, *(2 dc, ch1, 2 dc) in next chsp, ch1, skip chsp* repeat from * to * till end of row, close round with a sl st in 3rd ch from beg
With each next row you will add 1 chains between the V-st
V-stitch = (2dc, ch1, 2dc) in V-st, ch2 between V-sts
R5: sl st in next 2 st to move in 1st chsp, (ch3 (dc), 1dc, ch1, 2 dc) in chsp, ch2, skip chsp* (2 dc, ch1, 2 dc) in next chsp, ch2, skip chsp* repeat from * to * till end of row, close round with a sl st in 3rd ch from beg
V-stitch = (2dc, ch1, 2dc) in V-st, ch3 between V-sts
R6: sl st in next 2 st to move in 1st chsp, (ch3 (dc), 1dc, ch1, 2 dc) in chsp, ch3, skip chsp* (2 dc, ch1,2 dc) in next chsp, ch3, skip chsp* repeat from * to * till end of row, close round with a sl st in 3rd ch from beg
V-stitch = (2dc, ch1, 2dc) in V-st, ch4 between V-sts
R7: sl st in next 2 st, to move in 1st chsp, (ch3 (dc), 1dc, ch1, 2 dc) in chsp, ch4, skip chsp* (2 dc, ch1,2 dc) in next chsp, ch4, skip chsp* repeat from * to * till end of row, close round with a sl st in 3rd ch from beg
V-stitch = (2dc, ch1, 2dc) in V-st, ch5 between V-sts
R8: sl st in next 2 st, to move in 1st chsp, (ch3 (dc), 1dc, ch1, 2 dc) in chsp, ch5, skip chsp* (2 dc, ch1,2 dc) in next chsp, ch5, skip chsp* repeat from * to * till end of row, close round with a sl st in 3rd ch from beg
V-stitch = (2dc, ch1, 2dc) in V-st, ch5 between V-sts
R9 - R10: sl st in next 2 st, to move in 1st chsp, (ch3 (dc), 1dc, ch1, 2 dc) in chsp, ch5, skip chsp* (2 dc, ch1,2 dc) in next chsp, ch5, skip chsp* repeat from * to * till end of row, close round with a sl st in 3rd ch from beg
R11: sl st in next 2 st, to move in 1st chsp, (ch3 (dc), 6dc) in chsp, ch1, 1sc in chsp, ch1, *(7dc in chsp, ch1, 1sc in chsp, ch1* repeat from * to * till end of row, close round with a sl st in 3rd ch from beg
R12: sl st in next 2 st, to move in 1st chsp, ch3 (dc) + ch1, (1dc + ch1) repeat 6 times, ch1, 1sc do ks, ch1, *(1dc + ch1) repeat 7 times, ch1, 1sc do ks, ch1* repeat from * to * till end of row, close round with a sl st in 3rd ch from beg
Cut the yarn and sew the end.
FINISHING INSTRUCTIONS
The Bell makes a lovely small decoration for the Christmas tree or a gift embellishment.
From Soft to Stiff: Elevate Your Crochet with Perfect Starching
1. Prepare the Starch Mixture
- Mix liquid starch or make your own by boiling 1 part cornstarch with 2 parts water. Let it cool to room temperature. Adjust the starch-to-water ratio depending on the desired stiffness.
2. Soak the Item
- Submerge your crocheted item in the starch solution. Ensure it’s fully saturated. Gently squeeze out the excess liquid, being careful not to wring or distort the shape.
3. Shape the Item
- Lay the item on a flat, covered surface (like a foam board or a towel). Stretch and pin it into the desired shape, ensuring all edges and details are properly defined.
4. Let it Dry
- Allow the item to air dry completely in a well-ventilated area. Depending on the thickness of the material, this might take several hours to overnight.
5. Finish
- Once dry and stiff, carefully remove any pins and check the shape. Your item is now ready to use or display!
If you need extra stiffness, you can repeat the process or apply a commercial spray starch.
What’s Next?
Pin this post: Save this tutorial to your Pinterest boards so that you can come back to it later.
Leave a comment: I love to hear your feedback. Tell me in the comments below!
Share on Instagram and Facebook: When you make this project, share it on social media and tag me @sonanebeska. I love to see what you make!
You can browse through all of my other FREE crochet HOME and DECO patterns:
https://www.nebeska.eu/en/articles/crochet-patterns-and-tutorials/home-decoration-and-holidays/
MORE ANGELS PATTERNS?
If you love to crochet ANGELS as much as I do, I think you’ll love these other free crochet patterns. ❤️
Show your love any day of the year and make lovely and sweet little things for your loved ones:
MORE PATTERNS?
You know me, I love making homemade things and creating beautiful gifts for my family and my friends. I also love CHRISTMAS decoration! If you do as well, you may would love to try these patterns as well:
Explore More Crochet Patterns
If you love to crochet as much as I do, I think you’ll love these other free crochet patterns for kids. ❤️
Show your love any day of the year and make lovely and sweet little things for your loved ones:
♥♥♥
Have fun and let me know what you make. I would love to know how your project turns out.
Please don't forget to like and I really appreciate your comments.
If the pattern did not make sense to you, please don’t hesitate to contact me, I am happy to help :)
If you like this pattern, please follow and share my projects on social networks as a THANK YOU and to help me to create new projects and patterns for you.
Thank you very much once again for your visit and see you soon!
♥♥♥
