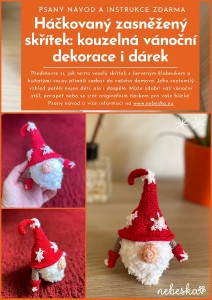
Crocheted Christmas Gnome: A Snowy Hat to Add Holiday Magic!
Hello My Crochet Friends!
Imagine this cheerful gnome with a red hat and fluffy beard bringing joy into your home. Its adorable look will delight not only children but also adults. It can decorate your Christmas table, windowsill, or become a unique gift for your loved ones. With a simple pattern and versatile colors, you can create an entire gnome family!
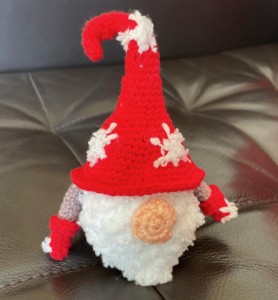
Tips and Tricks for Crocheting a Gnome
- The Magic of Colors
Experiment with different color combinations! The hat doesn’t have to be just red – try striped or colors that match your interior. - Perfect Body Shape
When stuffing the body, make sure it's firm but not too tight. Add the filling gradually and evenly so the gnome maintains its nice shape. - Safety Eyes
If you're crocheting the gnome for small children, use embroidered eyes instead of plastic safety ones. This will prevent the risk of small parts coming loose. - Shapeable Hat
Insert a piece of wire or pipe cleaner into the hat. This way, you can bend and position the hat as you like! - Unique Details
Decorate the gnome's hat with embroidery, stars, small bells, or a bow. Each gnome will be unique!
Now all that’s left is to grab your hook and start crafting!
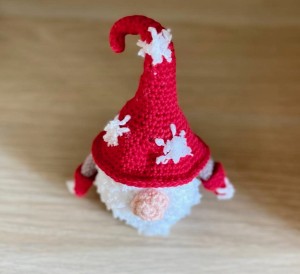
I hope you enjoy crocheting this cheerful gnome.
Excitement and happiness are guaranteed—this gnome is ready to add a touch of magic to your days!
If you pin my patterns to your Favorites and share it on social media as a link, I will be able to share a lot more free crochet patterns for you all.
Stay in touch at Facebook, Instagram and Pinterest.
Let's start or PIN this idea to your Pinterest boards for later.

More Crochet patterns?
For even more crochet patterns, check out my e-book.
CROCHET WITH LOVE AND NEBESKA
I prepared for you the e-book CROCHET WITH LOVE AND NEBESKA, it is a set of more than 60 projects with instructions and video instructions for the whole year 2023!
You can download the e-book as a pdf with links to allow you to better find the guide you need. Or maybe you missed one of the pattern instructions and now it will make you happy, or you are just looking for inspiration and one of my ideas will move you in your next creation!
This e-book is FREE and you can share it with your friends. Due to the size, it is necessary to download CROCHET WITH LOVE AND NEBESKA from the link (it cannot be sent as an e-mail attachment). Click on the ebook link or image and download the e-book CROCHET WITH LOVE AND NEBESKA 2023 for FREE.
https://forms.gle/CyJZqXs4fTWechtE6
All of the patterns on that list of beautifully designed, and suitable for both beginners and experienced crocheters. They are different levels of difficulties and techniques that you might have never seen before. Just click on them and you can find the free pattern, each of the patterns comes with a video tutorial.
CROCHETED CHRISTMAS GNOME WITH A SNOWY HAT – A HEARTWARMING SEASONAL PROJECT
This pattern is made for beginners - only a basic skill level is required to make it. If you don't understand any of my instructions, don't worry I am here for you.
Have questions? Join the Facebook Group OR my Youtube Community!
I hope this article will be useful for you! If you have any additional questions, feel free to join my Facebook Group or Youtube Community. I created these groups for you to share pictures, ask questions, and help each other out.
CROCHETED CHRISTMAS GNOME WITH A SNOWY HAT – A HEARTWARMING SEASONAL PROJECT
This CROCHETED GNOME is a cute Amigurumi Toy, easy and quick to crochet, great project for beginners. This little CROCHETED GNOME will give your own little one lots of fun at playtime.
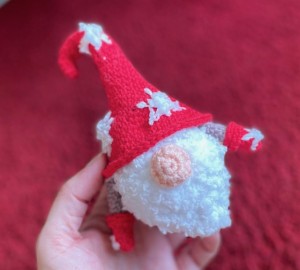
CROCHETED CHRISTMAS GNOME WITH A SNOWY HAT – A HEARTWARMING SEASONAL PROJECT
INSTRUCTIONS AND PATTERN NOTES
The crocheted gnome is a cute and cheerful toy, easy enough for an advanced beginner. You can play with different color combinations. I used Terezka yarn.
MATERIALS
The crocheted gnome is a toy or decoration that you can finish quickly.
What will we need?
- Yarn: I chose the soft cotton yarn Terezka, which I like to use for toys for kids and even babies.
Select colors you like for these parts:
- Body (Color A) – Any color; I chose brown-gray.
- Gloves and Hands (Colors B and A) – Gloves can match the hat; hands match the body.
- Hat (Color C) – I chose red, but any color or stripes will work.
- Beard (Color D) – White, light brown, cream, etc.
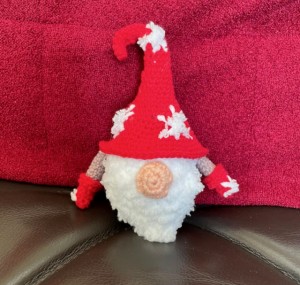
Recommended Yarn:
Terezka
50 g / 155 m / 100% cotton
https://www.vlnika.cz/z8544-prize-terezka
Additional Supplies:
- Hook: 3 mm
- Toy stuffing
- Optional: Safety eyes (6 or 8 mm)
- Sewing and embroidery needle
- Stitch marker
- Scissors
Difficulty: Level 1 – Easy for beginners
US crochet terms:
SlSt – slip stitch
CH/s – chain/s
SC - single crochet
HDC - half double crochet
SK - skip
T - turn
ST/s - stitch(es)
REP – repeat
SC2TOG = 2 single crochets together
Special stitches used:
Single Crochet Decrease (sc2tog)
A crochet decrease makes the current row or round that you are working on shorter than the one previous to it.
1. Insert hook into the first stitch.
2. Yarn over and draw through the loop.
3. Do not complete the stitch as normal.
4. Instead, insert the hook into the next stitch.
5. Yarn over and draw through the loop.
6. There should now be three loops on your hook
7. Yarn over and draw through all three loops on the hook
8. You should now have two single crochet stitches side-by-side, joined together into one stitch at the top.
This pattern requires familiarity with stitches used, attaching yarn, sewing parts together with a sewing needle.
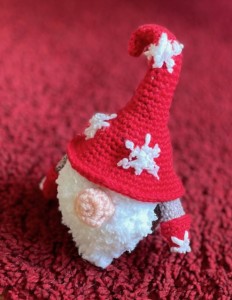
CROCHETED CHRISTMAS GNOME WITH A SNOWY HAT – A HEARTWARMING SEASONAL PROJECT
GENERAL INSTRUCTIONS AND NOTES:
- CH1 at the beginning of a round does not count as a stitch.
- Start with a magic ring and work in continuous spiral rounds.
- Spiral Rounds: Do not join with a slip stitch; use a stitch marker to mark the beginning of each round.
- Numbers in parentheses indicate the stitch count for each round.
- Gnome Size with a 3 mm Hook:
- Height: 15 cm
- Width: 10 cm
- Minimal Sewing: Attach the arms to the body, sew the beard to the head, and sew the nose onto the beard.
- Size Adjustments: Use a larger or smaller hook and yarn for a bigger or smaller gnome.
CROCHETED CHRISTMAS GNOME WITH A SNOWY HAT – A HEARTWARMING SEASONAL PROJECT
PATTERN SECTIONS
BODY
Color A
1ch at the beginning of the round does not count as a stitch.
Start with a magic ring and continue crocheting in spiral rounds. Do not join the round with a slip stitch.
R1: 1ch, 8sc into the magic ring (8 sc)
R2: 2sc in each st from R1 around repeat from * to * until the end of the round (16 sc)
R3: 2sc in next st, 1sc in next st repeat from * to * until the end of the round (24 sc)
R4: 1sc in next st, 2sc in next st, 1sc in next st repeat from * to * until the end of the round (32 sc)
R5: 2sc in next st, 1sc in the next 3 sts repeat from * to * until the end of the round (40 sc)
R6: 1sc in each BLO around (40 sc)
R7 – R19: 1sc in each st around (40 sc)
R20: 1sc in the next 3 sts, sc2tog repeat from * to * until the end of the round (32 sc)
R21: 1sc in each st around (32 sc)
R22: 1sc in the next 2 sts, sc2tog repeat from * to * until the end of the round (24 sc)
R23: 1sc in each st around (24 sc)
Stuff the body with toy stuffing.
R24: 1sc in next st, sc2tog repeat from * to * until the end of the round (16 sc)
R25: sc2tog repeat from * to * until the end of the round (8 sc)
Make sure the body is sufficiently stuffed before closing, but not overfilled, to avoid the stuffing showing through the stitches.
Cut the yarn and sew the end closed.
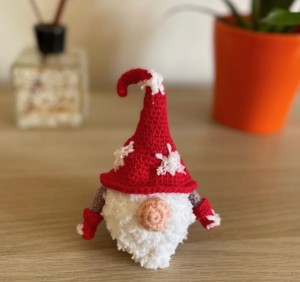
MITTEN AND HAND
Color B (the color used for the hat)
MITTEN
R1: 1ch, 6sc into the magic ring (6 sc)
R3: 2sc in next st, 1sc in next 2 sts repeat from * to * until the end of the round (8 sc)
R4: 2sc in next st, 1sc in next 3 sts repeat from * to * until the end of the round (10 sc)
HAND
Switch to Color A (the body color)
R5: 1sc in each BLO around (10 sc)
R5-R16: 1sc in each st around (10 sc)
R7: Fold in half and crochet the two edges together using slip stitches, stitch by stitch.
Crochet a total of 5 slip stitches.
Cut the yarn, leaving a long tail for sewing.
Attach Color B yarn to R5 and, working in the front loops, crochet the cuff: 2sc, 1sc in the next 4 sts repeat from * to * until the end of the round (12 sc).
Cut the yarn, finish off with an invisible join, and weave in the loose end.
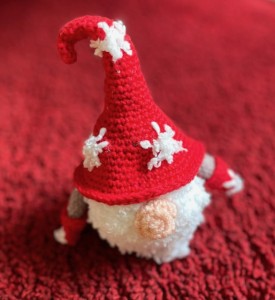
HAT
Color B
R1: 1ch, 6sc into the magic ring (6 sc)
R2 – R4: 1sc in each st around (6 sc)
R5: 2sc in next st, 1sc in next 2 sts repeat from * to * until the end of the round (8 sc)
R6 – R9: 1sc in each st around (8 sc)
R10: 2sc in next st, 1sc in next 3 sts repeat from * to * until the end of the round (10 sc)
R11 – R14: 1sc in each st around (10 sc)
R15: 2sc in next st, 1sc in next 4 sts repeat from * to * until the end of the round (12 sc)
R16 – R17: 1sc in each st around (12 sc)
R18: 2sc in next st, 1sc in next 3 sts repeat from * to * until the end of the round (15 sc)
R19 – R20: 1sc in each st around (15 sc)
R21: 2sc in next st, 1sc in next 4 sts repeat from * to * until the end of the round (18 sc)
R22 – R23: 1sc in each st around (18 sc)
R24: 2sc in next st, 1sc in next 2 sts repeat from * to * until the end of the round (24 sc)
R25: 1sc in each st around (24 sc)
R26: 2sc in next st, 1sc in next 3 sts repeat from * to * until the end of the round (30 sc)
R27: 1sc in each st around (30 sc)
R28: 2sc in next st, 1sc in next 4 sts repeat from * to * until the end of the round (36 sc)
R29: 1sc in each st around (36 sc)
R30: 2sc in next st, 1sc in next 5 sts repeat from * to * until the end of the round (42 sc)
R31: 1sc in each st around (42 sc)
R32: 2sc in next st, 1sc in next 6 sts repeat from * to * until the end of the round (48 sc)
R33 – R35: 1sc in each st around (48 sc)
R36: 2sc in next st, 1sc in next 7 sts repeat from * to * until the end of the round (54 sc)
R37: 1sc in each st around (54 sc)
Cut the yarn, finish off with an invisible join, and weave in the loose end.
Tip:
Ensure the hat is sufficiently stuffed before finishing the last rounds and attaching it, but not overstuffed to avoid fiberfill showing through the stitches.
For extra flexibility, you can insert a wire into the hat to allow the top to bend and tilt to the side.
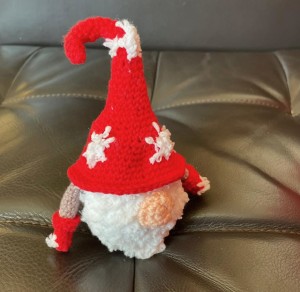
BEARD
Color C
R1: 1ch, 6sc into the magic ring (6 sc)
R2: 2sc in next st, 1sc in next st repeat from * to * until the end of the round (9 sc)
R3: 2sc in next st, 1sc in next 2 sts repeat from * to * until the end of the round (12 sc)
R4: 2sc in next st, 1sc in next 3 sts repeat from * to * until the end of the round (15 sc)
R5: 2sc in next st, 1sc in next 4 sts repeat from * to * until the end of the round (18 sc)
R6: 2sc in next st, 1sc in next 2 sts repeat from * to * until the end of the round (24 sc)
R7: 2sc in next st, 1sc in next 3 sts repeat from * to * until the end of the round (30 sc)
R8 – R10: 1sc in each st around (30 sc)
R11: 1sc in next 3 sts, dec repeat from * to * until the end of the round (24 sc)
R12 – R13: 1sc in each st around (24 sc)
Assembly:
Fold the crocheted piece in half and join the top edges by slip stitching stitch to stitch.
Crochet a total of 12 slip stitches.
Cut the yarn, leaving a long tail for sewing.
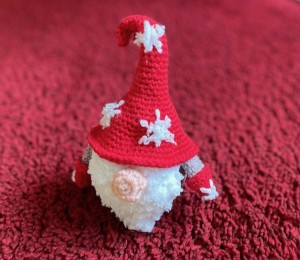
NOSE
Note: 1ch at the beginning of the round does not count as a stitch.
Start with a magic ring and work in continuous spiral rounds; do not join with a slip stitch.
R1: 1ch, 6sc into the magic ring (6)
R2: 2sc in each st around (12)
R3: 1sc in next 3 sts, 2sc in next st repeat from * to * until the end of the round (15)
R4: 1sc in each st around (15)
R5: 1sc in next 3 sts, dec repeat from * to * until the end of the round (12)
R6: dec around (6)
Cut the yarn, leaving a long tail for sewing.
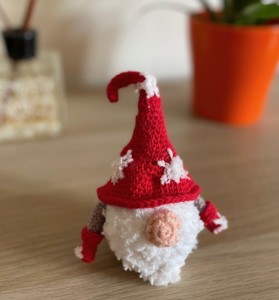
ASSEMBLY
- Sew the arms to the sides of the body.
- Sew the beard onto the body.
- Attach the nose onto the sewn beard.
For the hat, you can sew or embroider decorations like stars, hearts, flowers, or snowflakes.
Weave in all loose ends inside the body.
Feel free to embellish with a star, heart, or other decorations!
What’s Next?
Pin this post: Save this tutorial to your Pinterest boards so that you can come back to it later.
Leave a comment: I love to hear your feedback. Tell me in the comments below!
Share on Instagram and Facebook: When you make this project, share it on social media and tag me @sonanebeska. I love to see what you make!
More Crochet TOY's patterns?
For even more TOY'S crochet patterns, check out my collection.
All of the patterns on that list of beautifully designed, and suitable for both beginners and experienced crocheters.
Explore More Crochet Patterns
If you love to crochet as much as I do, I think you’ll love these other free crochet patterns.
♥♥♥
Have fun and let me know what you make. I would love to know how your project turns out.
Please don't forget to like and I really appreciate your comments.
If the pattern did not make sense to you, please don’t hesitate to contact me, I am happy to help :)
If you like this pattern, please follow and share my projects on social networks as a THANK YOU and to help me to create new projects and patterns for you.
Thank you very much once again for your visit and see you soon!
♥♥♥
