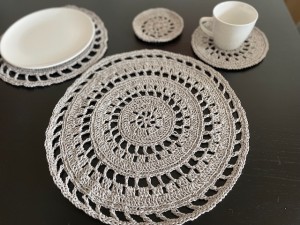
Crochet round Placemats rustic look with Raffiana Nature yarn
Hey everyone!
Welcome to my Blog! Your support is what directly allows me to keep creating more free video tutorials and patterns for our amazing crochet community!
Want to contribute? Here are three ways you can show your support:
-
Tip me: https://paypal.me/nebeskacrochetlove
-
Buy patterns: https://payhip.com/NebeskaCrochetwithLove
- Become a Patron and unlock even more content: https://herohero.co/crochetwithlove
Thanks a million, my crochet friends! Wishing you joy and color through yarn.
I truly believe in the magic of creativity.
-------------------------------------------------------
Have a Lovely Day!
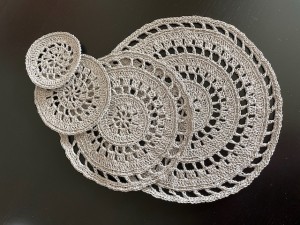
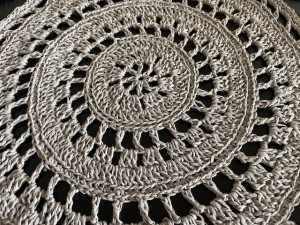
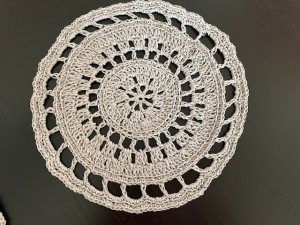
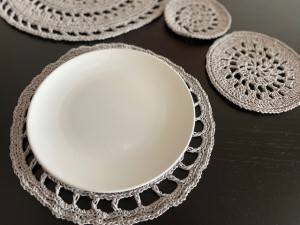
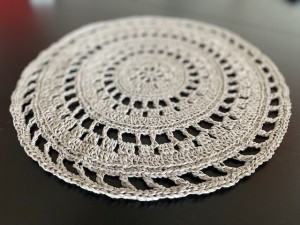
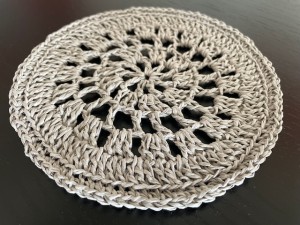
Elevate your dining experience with the understated beauty of handmade. This new crochet pattern guides you to create stunning round placemats using the unique texture of Raffia Nature paper yarn.
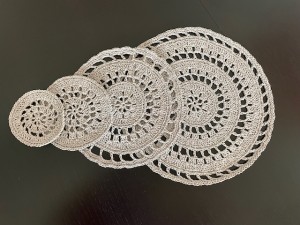
Discover how to craft these elegant mats, available in three versatile sizes, and bring a touch of natural sophistication to your table setting.
While I've chosen a neutral palette to highlight the yarn's inherent charm, Raffia Nature's extensive color range (over 20 shades!) allows you to perfectly match any décor.
You will love creating this handmade table mat with this easy-to-follow crochet pattern. I will teach you how to achieve the lovely texture so you can easily create elegant and functional pieces in no time.
The pattern includes instructions for three different sizes and features only basic stitches (double crochet, single crochet, chain) and a simple BLO technique, making it perfect for beginners. Bring a touch of sophisticated handmade style to your table!
The PDF download includes plenty of photos to ensure easy understanding and guide beginners.
VIDEO TUTORIAL
You can find the step-by-step video tutorials below which will help you along if you prefer to watch video instruction rather than using a written pattern. Don’t forget to subscribe if you like me videos, it’s FREE!
![]()
If you pin my patterns to your Favorites and share it on social media as a link, I will be able to share a lot more free crochet patterns for you all.
Stay in touch at Facebook, Instagram and Pinterest.
Let's start or PIN this idea to your Pinterest boards for later.
![]()
More Crochet patterns?
CROCHET WITH LOVE AND NEBESKA
I'm thrilled to present my 2024 e-book, CROCHET WITH LOVE AND NEBESKA!
Inside, you'll discover over 60 projects with patterns and video tutorials to inspire you all year long.
You can download the e-book as a PDF, complete with clickable links to easily find the patterns you're looking for. Perhaps you missed a pattern and are now happy to find it here.
Or maybe you're just looking for inspiration for your next project – I hope my ideas spark your creativity! The e-book is FREE and you can share it with your friends.
Due to its size, the e-book is available for download only via the link below (it cannot be sent as an email attachment). Click the link image below to download the CROCHET WITH LOVE AND NEBESKA 2024 and 2023 e-books for FREE!

CROCHET ROUND PLACEMATS RUSTIC LOOK WITH RAFFIANA NATURE YARN - FOUR SIZES
This pattern is made for beginners - only a basic skill level is required to make it. If you don't understand any of my instructions, don't worry I am here for you.
Have questions? Join the Facebook Group OR my Youtube Community!
I hope this article will be useful for you! If you have any additional questions, feel free to join my Facebook Group or Youtube Community. I created these groups for you to share pictures, ask questions, and help each other out.
CROCHET ROUND PLACEMATS RUSTIC LOOK WITH RAFFIANA NATURE YARN - FOUR SIZES
This CROCHET ROUND PLACEMATS RUSTIC LOOK WITH RAFFIANA NATURE YARN - FOUR SIZES is easy to crochet! Great original project for beginners.
INSTRUCTIONS AND RECOMMENDATIONS
Crocheted placemats are beautiful and useful household items, and also great as decorations. What will we need? Yarn - I chose the paper yarn Raffiana Nature, it is a quality paper yarn, which is ideal for crocheted home decorations for the apartment.
MATERIALS What do we need?
-
Recommended yarn: Raffiana Nature
-
Natural twisted paper yarn, which can be used especially for crocheting bags, handbags, hats, and various other accessories.
-
Ball: 200 g / 330 m / 100 % paper
-
Crochet hook: 3.0 mm
-
Sewing and embroidery needle
-
Stitch marker
-
Scissors
![]()
Difficulty Level: Level 1 – Easy, for beginners
US crochet terms:
SlSt – slip stitch
CH/s – chain/s
SC - single crochet
DC - double crochet
SK - skip
T - turn
ST/s - stitch(es)
REP – repeat
This pattern requires familiarity with stitches used and using invisible join when you work in closed rounds.
Special techniques:
- Back loop only (BLO) crocheting
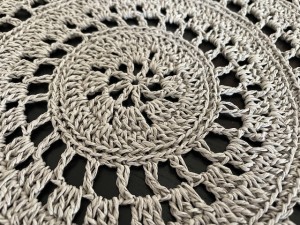
Embrace the Texture: The unique texture of paper yarn is part of its charm. Embrace the slightly different look and feel it brings to your projects.
CROCHET ROUND PLACEMATS RUSTIC LOOK WITH RAFFIANA NATURE YARN - FOUR SIZES
INSTRUCTIONS AND NOTES
- Remember, the first chain stitch in each row doesn't count as a stitch.
- We'll be working in closed rows. At the end of each row, close your work with sl st in the first st and chain 3 or ch 1 to start the next row.
- In the pattern, 3 chain stitches at the beginning of a row replace one single crochet.
- I recommend starting with a magic ring and working in continuous rounds. Finish each round with a slip stitch into the 3rd chain stitch at the beginning of the round.
- ( ) - the number in parentheses indicates the number of stitches in the row after completing the entire row.
Placemat size - diameter:
size 1 - big size - 35 cm
size 2 - medium size - 26 cm
size 3 - smaller size - 16 cm
size 4 - small size - 12 cm
Size may vary depending on crochet tension and yarn.
You can crochet the placemat to any size you like.
TIPS AND TRICKS
- Work Gently: Paper yarn can be less forgiving than traditional fiber yarns. Avoid pulling too hard, which can cause it to break or tear.
- Keep it Dry: Paper yarn is generally not water-resistant (unless specifically treated). Avoid getting your project wet. Store your yarn in a dry place.
- Mind Your Tension: Consistent tension is key. Because paper yarn has little to no stretch, uneven tension will be more noticeable in the finished fabric. You might need to adjust your usual tension.
- Listen to the Yarn: Paper yarn often has a unique feel and sound as you work with it. Pay attention to how it's behaving and adjust your technique accordingly.
- Consider Hook Size: You might need to experiment with hook sizes to find what works best for your chosen paper yarn and desired fabric density. A slightly larger hook than you might typically use can sometimes prevent the fabric from being too stiff.
CROCHET ROUND PLACEMATS RUSTIC LOOK WITH RAFFIANA NATURE YARN - FOUR SIZES
Written Pattern
Hook size 3.0 mm
Abbreviations:
- ch = chain
- ds = double crochet
- sc = single crochet
- sl st = slip stitch
Start each R with 3 ch.
- Note: ch3 at beg count as a stitch.
- Note: ch1 at beg doesn’t count as a stitch
Begin with a magic ring and work in closed rounds. Join each round with a slip stitch.
R 1: ch3 (counts as 1 dc), ch2, (dc + ch2) in the magic ring, closed round with a slip stitch in 3rd ch at beg (8 dc + 8 ch2spaces)
R 2: sl st in next st to move in ch2sp, dc3, 3dc in ch2sp, ch1 *4dc in ch2sp, ch1*, repeat from * to * around, join with a sl st to the 3rd ch at beg (8 times: 4dc groups and ch1 between them)
R 3: dc3, 1dc in next 3 st, 2dc in ch1sp *1dc next 4 st, 2dc in ch1sp *, repeat from * to * around, join with a sl st to the 3rd ch at beg (48 dc)
R 4: ch1, 1sc BLO in each st around, join with a sl st to the 1st st at beg (48 sc)
R 5: dc3, ch2, sk 1st, *1dc in next st BLO, ch2, sk 1 st *, repeat from * to * around, join with a sl st to the 3rd ch at beg (24x ch2spaces)
R 6: sl st in next st to move in ch2sp, dc3, 2dc in ch2sp, ch1 *3dc in next ch2sp, ch1 *, repeat from * to * around, join with a sl st to the 3rd ch at beg (24 time 3dc groups and ch1 between them // 72 dc)
R 7: dc3, 1dc in next 2 st, 2dc in ch1sp *1dc next 3 st, 2dc in ch1sp *, repeat from * to * around, join with a sl st to the 3rd ch at beg (120 dc)
R 8: ch1, 1sc BLO in each st around, join with a sl st to the 1st st at beg (120 sc)
R 9: dc3, ch3, sk 2 st, *1dc in next st BLO, ch3, sk 2 st *, repeat from * to * around, join with a sl st to the 3rd ch at beg (40 times ch3sp)
R 10: sl st in next st to move in ch3sp, dc3, 2dc in ch3sp, ch1 *3dc in next ch2sp, ch1 *, repeat from * to * around, join with a sl st to the 3rd ch at beg (40 times 3dc groups and ch1 between them)
R 11: note:
alternate 2 dc and 1 dc in ch1space
dc3, 1dc in next 2 st, 2dc in ch1sp, 1dc in next 3st, 1dc in next ch1sp *1dc next 3 st, 2dc in ch1sp, 1dc in next 3st, 1dc in next ch1sp *, repeat from * to * around, join with a sl st to the 3rd ch at beg (180 dc)
R 12: ch1, 1sc BLO in each st around, join with a sl st to the 1st st at beg (180 sc)
R 13: dc3, ch3, sk 2 st, *1dc in next st BLO, ch3, sk 2 st *, repeat from * to * around, join with a sl st to the 3rd ch at beg
R 14: ch1, 4sc in each ch3sp around, join with a sl st to the 1st st at beg (240 sc)
R 15: 1sl st BLO in each st around, join with an invisible join (240 sl st)
Finish off with a invisible join. Weave in the end.
SIZE 2 - MEDIUM SIZE
REPEAT THE INSTRUCTIONS FOR ROWS R1 - R8 SIZE 1 - LARGE SIZE
Continue crocheting:
R 9: dc3, ch4, sk 3 st, *1dc in next st BLO, ch4, sk 3 st *, repeat from * to * around, join with a sl st to the 3rd ch at beg (30 times ch4sp)
R 10: sl st in next st to move in ch4sp, ch1, 5sc in each ch4sp around, join with a sl st to the 1st 1st at beg (150 sc)
R 11: ch1, 1sc BLO in each st around, join with an invisible join (150 sc)
Weave in the end.
SIZE 3 - SMALLER SIZE
Begin with a magic ring and work in closed rounds. Join each round with a slip stitch.
R 1: ch3 (counts as 1 dc), ch2, (dc + ch2) in the magic ring, closed round with a slip stitch in 3rd ch at beg (8 dc + 8 ch2spaces)
R 2: sl st in next st to move in ch2sp, ch3, 2dc in ch2sp, ch1 *3dc in ch2sp, ch1*, repeat from * to * around, join with a sl st to the 3rd ch at beg (8 times: 3dc groups and ch1 between them)
R 3: turn, sl st to move in ch1 sp, dc3 in ch1sp, ch2, skip 1dc, 1dc in next st (middle st), ch2, skip 1dc, *1dc in ch1sp, ch2, sk 1 st, 1dc in next st (middle st), ch2, sk 1 st*, repeat from * to * around, join with a sl st to the 3rd ch at beg (16 times ch2spaces)
R 4: sl st to move in ch2sp, ch3, 2dc in ch2sp, ch1 *3dc in next ch2sp, ch1*, repeat from * to * around, join with a sl st to the 3rd ch at beg (16 times: 3dc groups and ch2 between them)
R 5: ch3, 1dc in next 2 st, 2dc in ch2sp, *1dc in next 3 st, 2dc in next ch2sp*, repeat from * to * around, join with a sl st to the 3rd ch at beg (80 dc)
R6: ch1, 1sc BLO in each st around (80 sc), join with an invisible join.
Weave in the end.
SIZE 4 - SMALL SIZE
Begin with a magic ring and work in closed rounds. Join each round with a slip stitch.
R 1: ch3 (counts as 1 dc), ch2, (dc + ch2) in the magic ring, closed round with a slip stitch in 3rd ch at beg (8 dc + 8 ch2spaces)
R 2: sl st in next st to move in ch2sp, ch3, 2dc in ch2sp, ch1 *3dc in ch2sp, ch1*, repeat from * to * around, join with a sl st to the 3rd ch at beg (8 times: 3dc groups and ch1 between them)
R 3: turn, sl st to move in ch1 sp, dc3 in ch1sp, ch2, skip 1dc, 1dc in next st (middle st), ch2, skip 1dc, *1dc in ch1sp, ch2, sk 1 st, 1dc in next st (middle st), ch2, sk 1 st*, repeat from * to * around, join with a sl st to the 3rd ch at beg (16 times ch2spaces)
R 4: ch3, *3dc in next ch2sp, 1dc in next st*, repeat from * to * around, join with a sl st to the 3rd ch at beg (64 dc)
R 5: ch1, 1sc BLO in each st around, (64 sc) join with an invisible join
Weave in the end.
Finish off with a invisible join. Weave in the end.

What’s Next?
Pin this post: Save this tutorial to your Pinterest boards so that you can come back to it later.
Leave a comment: I love to hear your feedback. Tell me in the comments below!
Share on Instagram and Facebook: When you make this project, share it on social media and tag me @sonanebeska. I love to see what you make!
You know me, I love making homemade things and creating beautiful gifts for my family and my friends. I also love to make HOME DECORATIONS so much. If you do as well, you may would love to try these patterns as well:
Explore More Crochet Patterns
If you love to crochet as much as I do, I think you’ll love these other free crochet patterns. ❤️
Show your love any day of the year and make lovely and sweet little things for your loved ones:
Explore More Crochet Patterns
If you love to crochet as much as I do, I think you’ll love these other free crochet patterns.
♥♥♥
Have fun and let me know what you make. I would love to know how your project turns out.
Please don't forget to like and I really appreciate your comments.
If the pattern did not make sense to you, please don’t hesitate to contact me, I am happy to help :)
If you like this pattern, please follow and share my projects on social networks as a THANK YOU and to help me to create new projects and patterns for you.
Thank you very much once again for your visit and see you soon!
♥♥♥