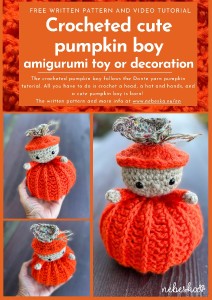
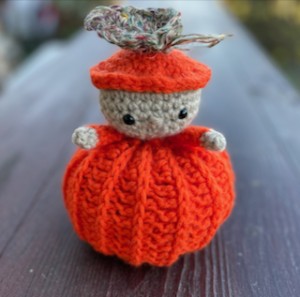
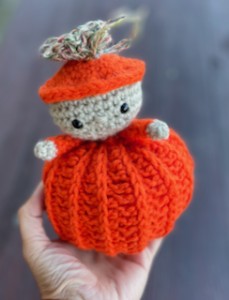
Crochet Cute Pumpkin Boy - Amigurumi toy or Fall decoration
Hello My Crochet Friends!
I’m so glad you enjoyed the crochet pumpkin tutorial! Now, let’s keep the fun going—since we already have a pumpkin, we can easily turn it into a cute pumpkin boy!
Once again, the instructions are simple and beginner-friendly.
The best part about this project is that you can crochet your pumpkin in any color, shape, or size. You can even use leftover yarn scraps to create it!
This pumpkin boy can be a lovely toy for children, a charming fall decoration for your home, or a fun piece for Halloween.
The tutorial uses single crochet stitches, and the best news—there’s no complicated sewing involved! You simply sew the head and hands onto the pumpkin body, and you’re done!
If you’d like, you can add a leaf to the pumpkin boy’s hat or crochet a different type of hat to suit your style. A Halloween hat would look great too, making this pumpkin figure absolutely perfect for Halloween!
You can find the instructions for the pumpkin here:
Have fun!
You can find the step-by-step video tutorials below which will help you along if you prefer to watch video instruction rather than using a written pattern.
Don’t forget to subscribe if you like me videos, it’s FREE!
![]()
Feel free to write a comment below the video! I look forward to all your notes!
This pattern is made for beginners - only a basic skill level is required to make it. If you don't understand any of my instructions, don't worry I am here for you - enter the comments at the end of this post.
A huge thanks to everyone who want to support my blog and download PDF paid pattern. Thank you very much, I really appreciate it and it helps me create more new video tutorials and patterns for you. Love you!
![]()
If you pin my patterns to your Favorites and share it on social media as a link, I will be able to share a lot more free crochet patterns for you all.
Stay in touch at Facebook, Instagram and Pinterest.
Let's start or PIN this idea to your Pinterest boards for later.
![]()
More Crochet patterns?
For even more crochet patterns, check out my e-book.
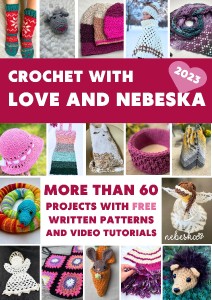
CROCHET WITH LOVE AND NEBESKA
I prepared for you the e-book CROCHET WITH LOVE AND NEBESKA, it is a set of more than 60 projects with instructions and video instructions for the whole year 2023!
You can download the e-book as a pdf with links to allow you to better find the guide you need. Or maybe you missed one of the pattern instructions and now it will make you happy, or you are just looking for inspiration and one of my ideas will move you in your next creation!
This e-book is FREE and you can share it with your friends. Due to the size, it is necessary to download CROCHET WITH LOVE AND NEBESKA from the link (it cannot be sent as an e-mail attachment). Click on the ebook link or image and download the e-book CROCHET WITH LOVE AND NEBESKA 2023 for FREE.
https://forms.gle/CyJZqXs4fTWechtE6
All of the patterns on that list of beautifully designed, and suitable for both beginners and experienced crocheters. They are different levels of difficulties and techniques that you might have never seen before. Just click on them and you can find the free pattern, each of the patterns comes with a video tutorial.
This pattern is made for beginners - only a basic skill level is required to make it. If you don't understand any of my instructions, don't worry I am here for you.
Have questions? Join the Facebook Group OR my Youtube Community!
I hope this article will be useful for you! If you have any additional questions, feel free to join my Facebook Group or Youtube Community. I created these groups for you to share pictures, ask questions, and help each other out.
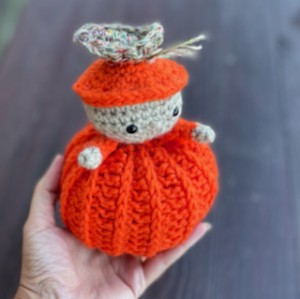
CROCHET CUTE PUMPKIN BOY
This CROCHET CUTE PUMPKIN BOY is a cute Amigurumi Toy, easy and quick to crochet, great project for beginners. This CROCHET CUTE PUMPKIN BOY will give your own little one lots of fun at playtime.
A CROCHET CUTE PUMPKIN BOY is also perfect as a fall or Halloween decoration, but also great for year-round use. You can customize it by adding a leaf, bow, ribbon, wooden button, or other embellishments.
MATERIALS AND DIRECTIONS:
This CROCHET CUTE PUMPKIN BOY is very easy and quick crochet project, you just need to know how to crochet SINGLE crochet stitch.
So let me now get started and tell you what you will need in order to crochet this CROCHET CUTE PUMPKIN BOY.
YARN: DANTE
https://www.vlnika.cz/z19373-prize-dante
1 ball: 100 g / 160 m / 100% acrylic
You can choose yarn to crochet toys with or your favorite home decor yarn.
Head, palms (color B) - can be any body color, preferably light brown or peach
Hat, hands (color A) - red, orange, yellow, green
![]()
For this pattern you will need 5.5 mm crochet hook.
Scissors
6 or 8 mm plastic safety eyes - 2 pieces
Stitch marker
Sewing/Embroidery and yarn needle/tapestry needle for sewing sides together and weaving in ends
Stuffing
CROCHET CUTE PUMPKIN BOY
Difficulty Level: Level 1 – Easy, for beginners
US crochet terms:
SlSt – slip stitch
CH/s – chain/s
SC - single crochet
HDC - half double crochet
SK - skip
T - turn
ST/s - stitch(es)
REP – repeat
TLO = third loop only
FLO = front loop only
BLO = back loop only
SC2TOG = 2 single crochets together
Special stitches used:
Single Crochet Decrease (sc2tog)
A crochet decrease makes the current row or round that you are working on shorter than the one previous to it.
1. Insert hook into the first stitch.
2. Yarn over and draw through the loop.
3. Do not complete the stitch as normal.
4. Instead, insert the hook into the next stitch.
5. Yarn over and draw through the loop.
6. There should now be three loops on your hook
7. Yarn over and draw through all three loops on the hook
8. You should now have two single crochet stitches side-by-side, joined together into one stitch at the top.
This pattern requires familiarity with stitches used, attaching yarn, sewing parts together with a sewing needle.
CROCHET CUTE PUMPKIN BOY
PATTERN NOTES
1) A ch1 and Ch2 at beginning of the row DOESN'T count as a stitch
2) Magic ring = the starting point for crocheting in a spiral. Use which ever method you prefer.
3) Continuous rounds - HEAD + HANDS is worked up in continuous rounds, which means that you will not be joining the last stitch of the round with the first one. Instead you will need to keep track of where each round started and how many stitches you have made because after each round you will continue right on to the stitches of the next round (with no join). It is useful to use a stitch marker or piece of yarn to mark the start or end of each round.
4) ( ) – The number of stitches that should be in a completed round/row are placed in brackets at the end of that round’s/row’s instructions.
5) This CROCHET CUTE PUMPKIN BOY Amigurumi measures:
hight: 15 cm
width: 13 cm
hand length: 4 cm
The finished size will depend on what yarn you use, as well as your tension and hook (as with any amigurumi).
6) You can make the CROCHET CUTE PUMPKIN BOY Amigurumi bigger with a thicker yarn or a larger hook size.
7) There is some sewing: you will sew the hat on the head, the head and hands on the body, This is easy to do, there are no tricks.
CROCHET CUTE PUMPKIN BOY
WRITTEN PATTERN
HEAD
Color B
Crochet hook 5.0 mm.
A ch1 at beg of the row DOESN'T count as a stitch
This part is worked in spiral rounds, without joining rounds. Do not join rounds.
Make a magic ring
R1: ch1, 6sc in magic ring (6sc)
R2: *2sc in each st* repeat from * to * till end of round (12 sc)
R3: *1sc in next st, 2sc in next st * repeat from * to * till end of round (18 sc)
R4: *1sc in next 2 st, 2sc in next st * repeat from * to * till end of round (24 sc)
R5: *1sc in next 3 st, 2sc in next st * repeat from * to * till end of round (30 sc)
R6 - R8: 1sc in each st around (30 sc)
R9: *1sc in next 3 st, sc2tog FLO* repeat from * to * till end of round (24 sc)
R10: *1sc in next 2 st, sc2tog FLO* repeat from * to * till end of round (18 sc)
Stuff the HEAD well.
Insert plastic safety eyes of 6 mm or 8 mm.
The eyes are 3, 4 or 5 st apart from each other.
Insert the eyes between rows 8 and 9
R11: *1sc in next st, sc2tog FLO* repeat from * to * till end of round (12 sc)
R12: *sc2tog FLO* repeat from * to * till end of round (6 sc)
Stuff more if needed before finishing round R11
R13: join all stitches together. I love to work in FLO.
Cut the yarn and leave a longer tail to sew the nose.
PUMPKIN HAT
Color A
Crochet hook 5.0 mm.
A ch1 at beg of the row DOESN'T count as a stitch
This part is worked in spiral rounds, without joining rounds. Do not join rounds.
Make a magic ring
R1: ch1, 6sc in magic ring (6sc)
R2: *2sc in each st* repeat from * to * till end of round (12 sc)
R3: *1sc in next st, 2sc in next st * repeat from * to * till end of round (18 sc)
R4: *1sc in next 2 st, 2sc in next st * repeat from * to * till end of round (24 sc)
R5: *1sc in next 3 st, 2sc in next st * repeat from * to * till end of round (30 sc)
R6: *2ks in next st, 1sc do nasl 4 sl* repeat from * to * till end of round (36 sc)
R7: 1 sl st in each st around (36 sl st)
Cut the yarn and leave a longer tail to sew the HAT on the top of the HEAD.
HAND
Color A and B
A ch1 at beg of the row DOESN'T count as a stitch
This part is worked in spiral rounds, without joining rounds. Do not join rounds.
Make a magic ring
Color A
R1: ch1, 4sc in magic ring (4 sc)
R2 - R5: 1 sc in each st around (4 sc)
Color B
R6: 1 sc in each st around BLO (4 sc)
R7: 1 sc in each st around (4 sc)
Cut the yarn and leave a longer tail to sew the HAND on the side of the BODY.
Repeat the pattern for the second HAND.
FINISHING AND SEWING - INSTRUCTIONS AND RECOMMENDATIONS
Make sure the head and the body is stuffed well before sewing, but not so firm that you can see the stuffing through the stitches. Work around the entire round
The exact moment for starting filling and stuffing the toy depends on every single person. I prefer filling the toy with the work almost finished. It’s a bit more difficult to fill, but more comfortable to crochet. You should make proofs until finding the more suitable moment of filling for you.
Stuff head and body firmly and full. Use a stuffing stick or the back end of a pencil to push the stuffing into the right spots.
Start sewing the HAT on the top of the HEAD. Sew the HEAD on the BODY.
Sew the HANDS on the BODY and make sure they are on one row.
Cut the yarn and sew the end.
Hide the yarn tails inside the body.
And voila! You made a CROCHET CUTE PUMPKIN BOY!
What’s Next?
Pin this post: Save this tutorial to your Pinterest boards so that you can come back to it later.
Leave a comment: I love to hear your feedback. Tell me in the comments below!
Share on Instagram and Facebook: When you make this project, share it on social media and tag me @sonanebeska. I love to see what you make!
You can browse through all of my other FREE crochet HOME and DECO patterns:
https://www.nebeska.eu/en/articles/crochet-patterns-and-tutorials/home-decoration-and-holidays/
MORE PATTERNS?
You know me, I love making homemade things and creating beautiful gifts for my family and my friends. I love HAPPY FALL COASTERS!
I also love to make Christmas decorations. If you do as well, you may would love to try these patterns as well:
Explore More Crochet Patterns
If you love to crochet as much as I do, I think you’ll love these other free crochet patterns for kids. ❤️
Show your love any day of the year and make lovely and sweet little things for your loved ones:
♥♥♥
Have fun and let me know what you make. I would love to know how your project turns out.
Please don't forget to like and I really appreciate your comments.
If the pattern did not make sense to you, please don’t hesitate to contact me, I am happy to help :)
If you like this pattern, please follow and share my projects on social networks as a THANK YOU and to help me to create new projects and patterns for you.
Thank you very much once again for your visit and see you soon!
♥♥♥