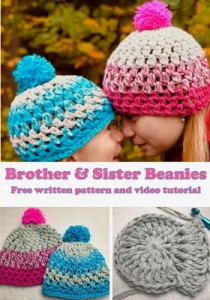
Truly Reversible Warm Beanie
How to crochet reversible warm beanie with pom-pom, easy and quick crochet for beginners, woman size
If you’re looking for an easy and quick pattern to make and want to crochet really warm beanie that’s as pretty as it is cozy look, choose this wonderful pattern with double crochet stitches only!
So what makes this beanie special? This pattern is totally REVERSIBLE! You get double the wear!


VIDEO TUTORIAL
You can find the step-by-step video tutorials below which will help you along if you prefer to watch video instruction rather than using a written pattern. Don’t forget to subscribe if you like me videos, it’s FREE!![]()
A huge thanks to everyone who want to support my blog and download PDF paid pattern. Thank you very much, I really appreciate it and it helps me create more new video tutorials and patterns for you. Love you!
Let's start or PIN this idea to your Pinterest boards for later.

If you like beanies crocheting, you would may love these 2 patterns as well:
Learn how to crochet this easy and quick and truly reversible beanie with the free pattern bellow. You will love the results. It makes a great handmade gift idea too - Christmas time is coming :)
To be honest, I am a bit indecisive person and could not decide which side of my beanie would be right and which one would be wrong:


so I made my beanie REVERSIBLE! Every day I can choose which one I put on! It is fantastic! And finally it is great solution and it’s an amazing result and I already tried it - it really works! I hope you love it as much as I do!

Truly Reversible Beanie Directions
Size
Size: woman size, this can easily be adapted to a smaller size or bigger size just by reducing or increasing the number of stitches in the first row and as well as making less or more rows for the beanie.
For this woman size you will need only one ball!
Bongo Batik – 100% acrylic, 100g/120m – 1 skein
For this pattern you will need 8 mm crochet hook.
Difficulty Level: Level 1 – very easy for ultimate beginners
US crochet term:
SlSt – slip stitch
CH/s – chain/s
SC – simple crochet
DC - double crochet
FPDC - front post double crochet
BPDC - back post double crochet
SK - skip
T - turn
ST/s - stitch(es)
REP - repeat
YO – yarn over

Pattern Notes
1) This pattern are for woman size can easily be adapted to a smaller size or bigger size just by reducing or increasing the numbers of stitches and as well as less or more numbers of rows. Remember that when making bigger beanie size, you will need more yarn.
2) This Beanie is crocheted in rounds from the top down using double crochets.
3) A Ch 3 at beg of the row counts as dc in the 1st three rounds only!
4) Finish each round with slip stitch in the 3rd ch from beg
I love that pattern and many people do so, this beanie is so popular!
WRITTEN PATTERN
Make a magic circle.
Work in rounds
R1: ch3 (those first ch3 will count as a dc), 11dc in the ring. sl st in the 3rd ch from beg. (12 dc in total)
We will do increasing in the next round
R2: ch3(counts as 1dc), dc in the same st as ch3, then 2dc in each next st around. sl st in the 3rd ch from beg (24dc)
R3: ch3 (counts as 1dc), 1fpdc around the ch3 from R2, 1bpdc around the next dc,
rep: *1bpdc, 1dc between 2 dc from R2, 1bpdc, 1dc between 2dc from R2, 2fpdc* repeat from * to * 4 more times.
The last section: 1dc between 2dc from R2, 1bpdc, 1dc between 2 dc from R2, 1 bpdc, sl st in the 3rd ch from beg
There are 36 sts in R3.
R4: ch3 (don't count it as a st), rep: *1fpdc in next 2sts, 1bpdc in next 4sts* repeat from * to * 6 more times. sl st in the 3rd ch from beg
There are 36 sts in R4.
R5 - 16: repeat R4 for next 12 rounds
Make sure you have 36 sts in each round to make the beanie big enough for woman head.
Cut the yarn. Fasten off.
Add the Pom-pom on top of the Beanie.

Have fun and let me know what you make. I would love to know how your project turns out.
Please don't forget to like and I really appreciate your comments.
If the pattern did not make sense to you, please don’t hesitate to contact me, I am happy to help :)
If you like this pattern, please follow and share my projects on social networks as a THANK YOU and to help me to create new projects and patterns for you.
Thank you very much once again for your visit and see you soon!


