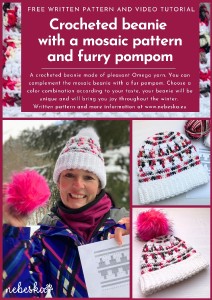
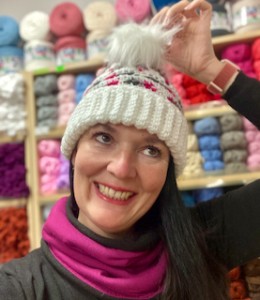
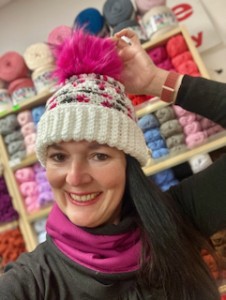
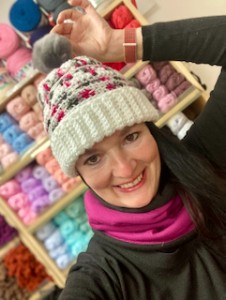
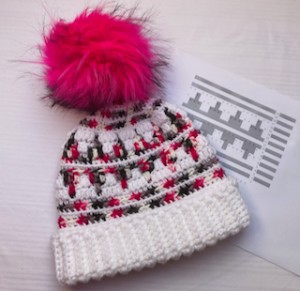
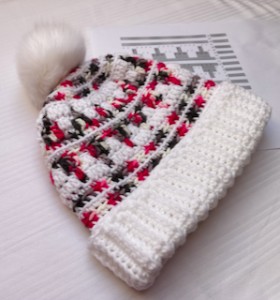
Crocheted beanie with a mosaic stitch pattern and fluffy furry pompom
Hello My Crochet Friends!
Today I have a tutorial for you on a crocheted beanie with a beautiful mosaic pattern. I really like mosaic patterns and I also enjoy creating and drawing them, choosing colors that match and are also contrasting so the pattern stands out nicely.
Mosaic pattern is fun! Come and join me in crocheting rows of single and double crochet stitches and enjoy how the mosaic gradually appears.
This mosaic has several horizontal rows and a diamond pattern between them, which is quite easy and quick to remember. If you are starting with mosaic, I believe this pattern will be easy for you.
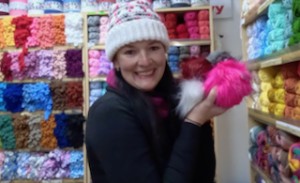
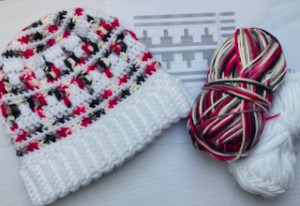
I chose Omega Milk Cotton yarn, it is an amazingly soft, pleasant acrylic yarn - you can choose from many amazing colors and there are also many multicolor skeins available.
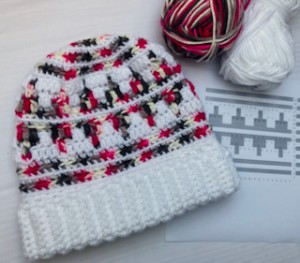
Mosaic crochet always uses two yarns - a main color and a contrasting color. The color choices are up to you! It's an easy way to create a unique design. I went with a bright white and a colorful multi that ranges from pink to anthracite - it was the perfect combo for this mosaic pattern.
This crocheted beanie is light, soft, and warm - perfect for winter, spring, and fall. The pattern is sized for women, but it's easy to adjust for men and children.
This beanie pattern is super easy - no complicated shaping required! We'll start with a stretchy ribbed brim and then work in rounds from the bottom up.
I've chosen a simple mosaic stitch that's easy to learn and looks great. You can customize the height by adjusting the number of rows above and below the diamond design.
Excited to try mosaic crochet? Let's get started!
VIDEO TUTORIAL
You can find the step-by-step video tutorials below which will help you along if you prefer to watch video instruction rather than using a written pattern. Don’t forget to subscribe if you like me videos, it’s FREE!
![]()
If you pin my patterns to your Favorites and share it on social media as a link, I will be able to share a lot more free crochet patterns for you all.
Stay in touch at Facebook, Instagram and Pinterest.
Let's start or PIN this idea to your Pinterest boards for later.
![]()
More pattern? CROCHET WITH LOVE AND NEBESKA
I'm thrilled to present my 2024 e-book, CROCHET WITH LOVE AND NEBESKA!
Inside, you'll discover over 60 projects with patterns and video tutorials to inspire you all year long.
You can download the e-book as a PDF, complete with clickable links to easily find the patterns you're looking for. Perhaps you missed a pattern and are now happy to find it here.
Or maybe you're just looking for inspiration for your next project – I hope my ideas spark your creativity! The e-book is FREE and you can share it with your friends.
Due to its size, the e-book is available for download only via the link below (it cannot be sent as an email attachment). Click the link image below to download the CROCHET WITH LOVE AND NEBESKA 2024 and 2023 e-books for FREE!


Have questions? Join the Facebook Group!
I hope this article will be useful for you! If you have any additional questions, feel free to join my Facebook Group. I created this group for you to share pictures, ask questions, and help each other out.
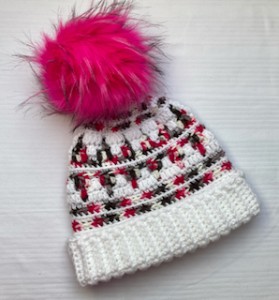
CROCHETED BEANIE WITH MOSAIC PATTERN AND FUR POMPOM
I love crocheting gifts for my dear friends and family. Hats, beanies, berets, and caps are a welcome gift from fall to spring. You can choose different interesting and original patterns, colors, shapes, and your work will wonderfully complete the outfit of everyone you gift.
CROCHETED BEANIE WITH MOSAIC PATTERN AND FUR POMPOM
This tutorial is intended for advanced beginners. Basic knowledge of crochet is required, everything is explained in the detailed instructions below and shown in detail in the video tutorial.
If you have any questions about the tutorial, I am here for you. Do not hesitate to contact me.
CROCHETED BEANIE WITH MOSAIC PATTERN AND FUR POMPOM
INSTRUCTIONS
This is a crocheted beanie with a simple diamond mosaic pattern. The beanie fits wonderfully!
Crocheting this hat requires a bit more patience, you need to learn mosaic crochet and the pattern. But as soon as you crochet a few stitches, the pattern repeats and then it goes one two. You can play with different color combinations and I believe that the tutorial will entertain you as much as it does me!
The pattern is crocheted with: Omega yarn
1 skein: 100g / 240m / 100% microacrylic
There are multi-colored and single-colored shades available, which you can combine.
Colors:
Women's hat:
main color: A (white)
secondary color B (burgundy-anthracite)
![]()
Crochet hook 3.5 and 4.0 mm.
You will also need: a stitch marker, scissors, a needle and ideally a tailor's meter.
CROCHETED BEANIE WITH MOSAIC PATTERN AND FUR POMPOM - SIZE:
The instructions below are prepared for a women's size, head circumference 55 cm.
The size can be adjusted to smaller or larger, for toddlers and adult men, very easily, by adjusting the number of stitches and rows. Recommendations on how to adjust the hat can be found in the instructions below.
Size: bellow there is a pattern for Woman Medium Size, the head measurement 22 inch / 55 cm.
Difficulty Level: Level 2 – for Advanced Beginners
US crochet terms:
SlSt – slip stitch
CH/s – chain/s
SC - single crochet
DC - double crochet
BLO – back loop only
FLO – front loop only
Sc2tog - single crochet decrease, 2 single crochets together
SK - skip
T - turn
ST/s - stitch(es)
REP - repeat
YO – yarn over
Special stitches used:
Drop-down DC / Mosaic DC (m-dc) – Drop-Down Double Crochet – Work a double crochet in the front loop of stitch 2 rows below.
CROCHETED BEANIE WITH MOSAIC PATTERN AND FUR POMPOM
PATTERN NOTES
1) The pattern below is for adult women medium size can be easily adapted to a smaller size or bigger size just by reducing or increasing the numbers of stitches and as well as less or more numbers of rows. Remember that when making bigger hat size, you will need more yarn.
Adult Woman Medium Size:
Head measurement: 22 inch / 55 cm
Hat Length: 9 / 23 cm
Hat circumference is 18 inch / 46 cm
*Measurements are taken from the garment lying flat, before the yarn has stretched out/dropped.
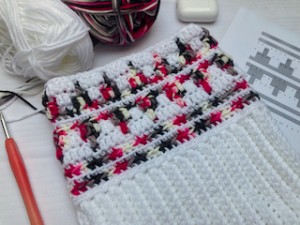
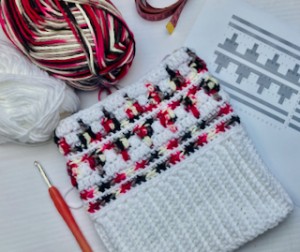
2) The HAT is crocheted in rounds, from the bottom to the top, using amazing MOSAIC pattern
Crocheted beanie Omega with mosaic chart.pdf
3) This HAT is worked up as a one piece, starting with a border on the bottom of the HAT and finish on the top of the HAT.
4) To finish the HAT, you’ll join together the shorter sides to form a tube. After that, gather the opening - one end of the tube is gathered to create the Beanie shape.
3) A Ch 1 at beg of the row DOESN'T count as stitch
SIZE
The pattern is easy to adjust to fit different head sizes from Toddler to Adult sizes
I’ll show you a hat size chart and a simple formula to follow for a perfect fit each and every time.
Crochet Hat Size Chart
Wondering what size hat to make? To correctly size a crochet hat, you’ll want to make a Hat that’s just a bit smaller than your head size. This way, when the hat stretches, it will fit your head perfectly.
To find your perfect size, use a tape measure to measure the widest part of your head. This will give you your head circumference measurement.
Then, subtract about 2-4 inches from this to get the finished hat size measurement. Since this stitch pattern is very stretchy, I find that 4 inches of negative ease gives me a nice fit.
My example
For example, my head measurement is 22 inch, which puts me in the Adult Medium size. After I subtract 4 inches of negative ease, I know I want a make the circumference of the hat 18 inch.
To make my beanie, I crocheted as many rows as it took to reach a finished hat size of 18 inch, which turned out to be 65 rows plus 1 seaming row.
To make a well-fitting hat, crochet as many rows as you need to reach the appropriate hat length measurement.
And then, crochet as many rows as you need to reach the appropriate hat circumference measurement.
CROCHETED BEANIE WITH MOSAIC PATTERN AND FUR POMPOM
PATTERN - NOTES
The Hat is decreasing from the bottom to the top, so the top is narrower than the center of the hat. This will come in handy when it’s time to gather the opening and finish the hat.
The mosaic crochet hat is worked from the bottom up. The bottom border is worked in rows and then joined. The mosaic pattern is worked on the border in rounds.
The top of the hat is decreased and gathered to close the top of hat.
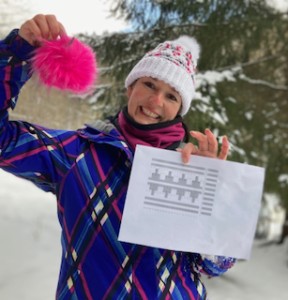
How to reach a Crochet Mosaic Chart:
Crocheted beanie Omega with mosaic chart.pdf
The chart is read from right to left for each round.
Rounds are worked in alternating colors, as indicated on the right column.
The entire round is worked in the color stated.
Ignore the colors displayed in each box; this shows how the pattern will look; you will not change color throughout a round.
A blank box indicates you will work a sc in the BLO.
A box marked with an X indicates working a drop-down double crochet.
When working mosaic crochet in the round, don’t cut colors. Drop off the color at the end of the round and pick up new color as you go. Color is changed at the sl st join.
Always tighten yarn tails when joining at the end of each round; this will keep the join invisible.
CROCHETED BEANIE WITH MOSAIC PATTERN AND FUR POMPOM
WRITTEN INSTRUCTIONS - WOMEN'S SIZE
I would recommend you to take your measurement at first.
I took the measurements of my head, which is 22 inch / 55 cm.
I need beanie with these measurements:
Foundation chain: 12 cm / 4.7 inch
Hat circumference is 18 inch / 46 cm
Note: A fabric measuring tape is useful here, since it’s more flexible than a ruler.
Crochet Hook 4.5 mm
Make a slip knot and chain foundation chain: 17 chains
R1: ch1, 1 sc in the second chain from your hook, 1 sc in each st till end of row. Turn (17 st)
R2: ch1, 1 sc in each st BLO, turn (17 st)
R3 – R72: Repeat rows R2 until you reach your measurement.
Join the side with a slip stitch, fold the rectangle in half, bring the short sides together and join sides with slip stitches. Make 17 slip stitches.
Turn your work on the right side.
R1 - R23: MOSAIC PATTERN
Color A
Foundation row R1: 1 sc in each st around (65 stitches)
Single crochet in each stitch around. For the mosaic pattern, we will need a number of stitches divisible by 5. In this first row, please adjust the number of stitches. I end up with 65, so I will have 13 repetitions of the mosaic pattern.
Crochet Hook 4.5 mm
DECREASING TOP OF THE HAT:
Work in spiral rounds, don't close the round with a slip stitch.
Color B
R18: *1sc in next 11 st, sc2tog*, repeat from * to * till end of round (60 st)
Color A
R19: *1sc in next 4 st, sc2tog*, repeat from * to * till end of round (50 st)
Color B
R20: *1sc in next 3 st, sc2tog*, repeat from * to * till end of round (40 st)
Color A
R21: *1sc in next 2 st, sc2tog*, repeat from * to * till end of round (30 st)
Color B
R22: *1sc in next 2 st, sc2tog*, repeat from * to * till end of round (20 st)
Color A
R23: *sc2tog*, repeat from * to * till end of round (10 st)
Optional: If you would like the hat to be a little longer, you can add rows of single crochet: 1 sc in each st around between the decrease rows.
ALL SIZES FINISHING INSTRUCTIONS:
Gather the top of the hat.
Pull the yarn tail to gather the top edge of the hat, and pull it closed. You can knot the yarn tail to secure it. Cut the yarn, weave in the ends.
Lay your hat out and smooth down.
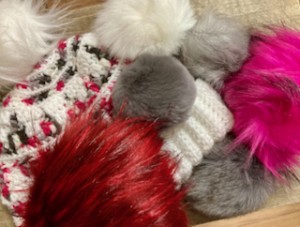
We will add a pompom to the top of the hat.
You can attach the pompom to the beanie by sewing a button to the inside of the hat and attaching the pompom to the button with an elastic band.
Do you like pompoms? I chose bright pink and white so that it would match nicely with the beautiful colors on the beanie.
And that's it! Your new beanie with a mosaic pattern and a fur pompom is finished! Don't forget to show off your original creations on social media and tag me so I can see what beautiful pieces you have created! Whatever color combination you have chosen, I believe that your beanie will be unique and will bring you joy all winter long.

What’s Next?
Pin this post: Save this tutorial to your Pinterest boards so that you can come back to it later.
Leave a comment: I love to hear your feedback. Tell me in the comments below!
Share on Instagram and Facebook: When you make this project, share it on social media and tag me @sonanebeska. I love to see what you make!
You can browse through all of my other FREE crochet HAT's patterns:
More Crochet WINTER patterns?
For even more WINTER crochet patterns, check out my collection.
All of the patterns on that list of beautifully designed, and suitable for both beginners and experienced crocheters.
I would recommend you to match your CROCHET HAT with this beautiful COWL / NECKWARMER
OR WITH THIS LOVELY COCOOC SHRUG CARDIGAN:
Do you love the HAT crocheting? Hats are always good gift ideas. You would may like to try also these patterns:
Explore More Crochet Patterns
If you love to crochet as much as I do, I think you’ll love these other free crochet HAT's patterns for KIDS as well.
♥♥♥
Have fun and let me know what you make. I would love to know how your project turns out.
Please don't forget to like and I really appreciate your comments.
If the pattern did not make sense to you, please don’t hesitate to contact me, I am happy to help :)
If you like this pattern, please follow and share my projects on social networks as a THANK YOU and to help me to create new projects and patterns for you.
Thank you very much once again for your visit and see you soon!
♥♥♥