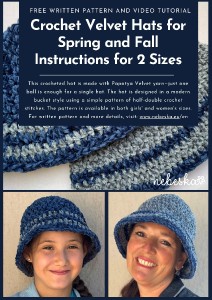
Crochet Velvet Bucket Hats for Spring and Fall
Hello My Crochet Friends!
Today, I have a tutorial for crocheting a spring-fall hat using the gorgeous Papatya Velvet yarn.
This hat has a simple shape—it's a classic bucket hat. I usually crochet this style as a summer hat, so you might remember it from last year, when I also made a winter version with woolen yarn.
Now, I’ve created an autumn hat using velvet yarn.
Thanks to the easy half-double crochet stitches, this hat is quick to make—you can finish it in just one day!
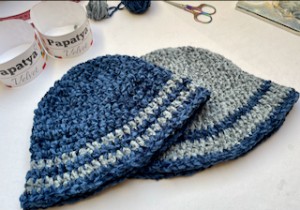
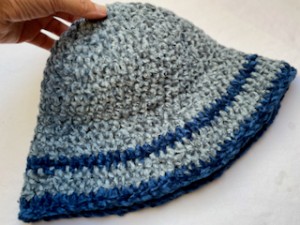
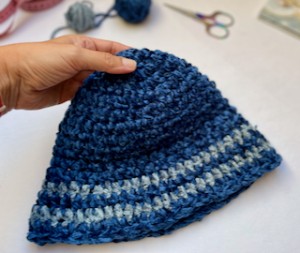
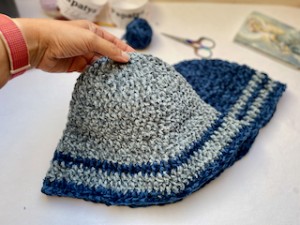
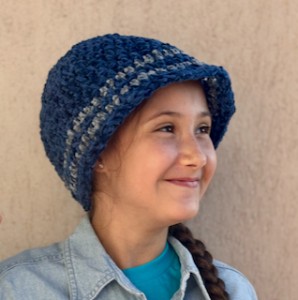
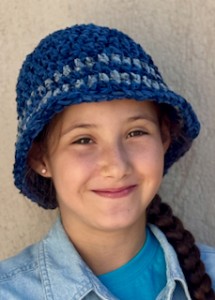
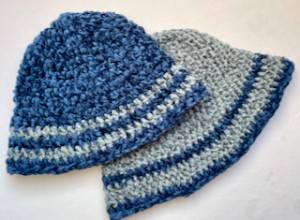
I was really excited to try the Papatya Velvet yarn for the first time. It's soft, cozy, and comes in a wonderful variety of colors. For the women’s size, I chose gray for the hat with dark blue stripes on the brim to add some flair. For the girls' size, I went with a dark blue hat and gray stripes. Now, these hats are modern and stylish!
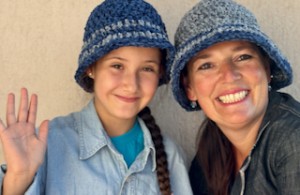
Today, we’ll be making a crocheted hat for autumn or spring. It’s warm enough for colder days and even suitable for winter. The pattern includes sizes for both women and girls, and you can easily adjust it to your own size and preferences.
There’s no complicated shaping—the hat is worked from top to bottom in one simple piece.
I chose a basic half-double crochet pattern, which is perfect even for beginners.
Are you excited to crochet your own velvet hat? Let’s get started!
The pattern is available here below for free. It comes with a video guide as well.
VIDEO TUTORIAL
You can find the step-by-step video tutorials below which will help you along if you prefer to watch video instruction rather than using a written pattern. Don’t forget to subscribe if you like me videos, it’s FREE!
![]()
If you pin my patterns to your Favorites and share it on social media as a link, I will be able to share a lot more free crochet patterns for you all.
Stay in touch at Facebook, Instagram and Pinterest.
Let's start or PIN this idea to your Pinterest boards for later.
![]()
More Crochet patterns?
For even more crochet patterns, check out my e-book.
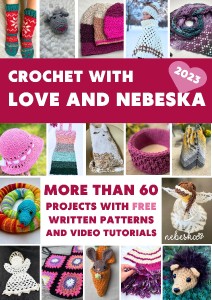
CROCHET WITH LOVE AND NEBESKA
I prepared for you the e-book CROCHET WITH LOVE AND NEBESKA, it is a set of more than 60 projects with instructions and video instructions for the whole year 2023!
You can download the e-book as a pdf with links to allow you to better find the guide you need. Or maybe you missed one of the pattern instructions and now it will make you happy, or you are just looking for inspiration and one of my ideas will move you in your next creation!
This e-book is FREE and you can share it with your friends. Due to the size, it is necessary to download CROCHET WITH LOVE AND NEBESKA from the link (it cannot be sent as an e-mail attachment). Click on the ebook link or image and download the e-book CROCHET WITH LOVE AND NEBESKA 2023 for FREE.
https://forms.gle/CyJZqXs4fTWechtE6
All of the patterns on that list of beautifully designed, and suitable for both beginners and experienced crocheters. They are different levels of difficulties and techniques that you might have never seen before. Just click on them and you can find the free pattern, each of the patterns comes with a video tutorial.
This pattern is made for beginners - only a basic skill level is required to make it. If you don't understand any of my instructions, don't worry I am here for you.
Have questions? Join the Facebook Group OR my Youtube Community!
I hope this article will be useful for you! If you have any additional questions, feel free to join my Facebook Group or Youtube Community. I created these groups for you to share pictures, ask questions, and help each other out.
CROCHET VELVET BUCKET HATS FOR SPRING AND FALL - DIRECTIONS:
This cosy and warm bucket Hat is quite easy crochet project, you just need to know how to crochet half double crochets.
So let me now get started and tell you what you will need in order to crochet this Velvet Bucket Hat.
The pattern was made with yarn:
Papatya Velvet
https://www.vlnika.cz/z14519-prize-papatya-velvet
1 skein: 100 g / 100 m / 100 % acrylic
![]()
1 ball is perfect for one HAT.
For this pattern you will need 6 mm crochet hook.
Scissors and tapestry needle and I would recommend you to use a tape measure and a stitch marker.
CROCHET VELVET BUCKET HATS FOR SPRING AND FALL
Size: bellow there is a pattern for
Woman Medium Size, the head measurement 21.5 inch / 55 cm.
Girls 10-years old Size, the head measurement 20.7 inch / 53 cm.
The Winter Bucket Hats can easily be adapted to a smaller size or bigger size.
Difficulty Level: Level 1 – for Beginners
US crochet terms:
SlSt – slip stitch
CH/s – chain/s
HDC - half double crochet
BLO – back loop only
FLO – front loop only
SK - skip
T - turn
ST/s - stitch(es)
REP - repeat
YO – yarn over
CROCHET VELVET BUCKET HATS FOR SPRING AND FALL - PATTERN NOTES
1) The patterns below are for adult women medium size and for girls size and they can be easily adapted to a smaller size or bigger size just by reducing or increasing the numbers of stitches and as well as less or more numbers of rows. Remember that when making bigger hat size, you will need more yarn.
Adult Woman Medium Size:
Hat Length: 9,4 inch / 24 cm
Hat circumference is 22 inch / 56 cm
Brim: 4 inch / 10 cm
Girls 10 years old Size:
Hat Length: 8.4 inch / 21.5 cm
Hat circumference is 19.5 inch / 50 cm
Brim: 3.5 inch / 9 cm
*Measurements are taken from the garment lying flat, before the yarn has stretched out/dropped.
2) The HAT is crocheted in rounds, from the top down, using half double crochet stitches
3) This HAT is worked up as a one piece, starting with a top - a magic ring and finish with a brim down.
4) A Ch 1 at beg of the row DOESN'T count as stitch
5) Magic ring = the starting point for crocheting in a spiral. Use which ever method you prefer.
6) Closed rounds - the hat is worked up in closed rounds, which means that you will be joining the last stitch of the round with the first one.
7) ( ) – The number of stitches that should be in a completed round/row are placed in brackets at the end of that round’s/row’s instructions.
HOW TO CROCHET VELVET BUCKET HATS FOR SPRING AND FALL
WOMAN SMALL / MEDIUM SIZE
WRITTEN PATTERN
I would recommend you to take your measurement at first.
I took the measurements of my head, which is 21.3 inch / 55 cm.
I need hat with these measurements:
Hat circumference is 21.8 inch / 56 cm.
Note: A fabric measuring tape is useful here, since it’s more flexible than a ruler.
Crochet Hook 6.0 mm
Make a magic ring
ch2 = hdc at beg of row
Close round with sl st in 1st st at beg

R1: ch1, 8 hdc in magic ring. Close round with sl st in 1st st at beg (8 hdc)
R2: *2hdc in nex st* repeat from * to * till end of row, close the row with a sl st (16 hdc)
R3: *2hdc in nex st, 1hdc in nex st* repeat from * to * till end of row, close the row with a sl st (24 hdc)
R4: *2hdc in nex st, 1hdc in next 2 st* repeat from * to * till end of row, close the row with a sl st (32 hdc)
R5: *2hdc in nex st, 1hdc in next 3 st* repeat from * to * till end of row, close the row with a sl st (40 hdc)
R6: *2hdc in nex st, 1hdc in next 4 st* repeat from * to * till end of row, close the row with a sl st (48 hdc)
R7 - R11: *1hdc in nex st* repeat from * to * till end of row, close the row with a sl st (48 hdc)
R12: *1hdc in next st FLO* repeat from * to * till end of row, close the row with a sl st (48 hdc)
R13: *2hdc in nex st, 1hdc in next 4 st* repeat from * to * till end of row, close the row with a sl st (58 hdc)
R14: *1hdc in nex st* repeat from * to * till end of row, close the row with a sl st (58 hdc)
R15: *2hdc in nex st, 1hdc in next 6 st* repeat from * to * till end of row, close the row with a sl st (66 hdc)
R16: *1hdc in nex st* repeat from * to * till end of row, close the row with a sl st (66 hdc)
R17: *2hdc in nex st, 1hdc in next 7 st* repeat from * to * till end of row, close the row with a sl st (74 hdc)
R18: *1hdc in nex st* repeat from * to * till end of row, close the row with a sl st (74 hdc)
R19: *1po in nex st* repeat from * to * till end of row, (74 po) close the row with a sl st or make an invisible join
Optionally: you can one or more rounds: 1hdc in each st around, join round with slip stitch or with invisible join.
Cut the yarn, weave in the ends.

GIRLS 10 YEARS OLD SIZE
WRITTEN PATTERN
I would recommend you to take your measurement at first.
I took the measurements of girl's head, which is 21.3 inch / 53 cm.
I need hat with these measurements:
Hat circumference is 20.7 inch / 56 cm.
Note: A fabric measuring tape is useful here, since it’s more flexible than a ruler.
Crochet Hook 6.0 mm
Make a magic ring
ch2 = hdc at beg of row
Close round with sl st in 1st st at beg
Make a magic ring
ch2 = hdc at beg of row
Close round with sl st in 1st st at beg
R1: ch1, 8 hdc in magic ring, Close round with sl st in 1st st at beg (8 hdc)
R2: *2hdc in nex st* repeat from * to * till end of row, close the row with a sl st (16 hdc)
R3: *2hdc in nex st, 1hdc in nex st* repeat from * to * till end of row, close the row with a sl st (24 hdc)
R4: *2hdc in nex st, 1hdc in next 2 st* repeat from * to * till end of row, close the row with a sl st (32 hdc)
R5: *2hdc in nex st, 1hdc in next 3 st* repeat from * to * till end of row, close the row with a sl st (40 hdc)
R6 - R10: *1hdc in nex st* repeat from * to * till end of row, close the row with a sl st (40 hdc)
R11: *1hdc in next st FLO* repeat from * to * till end of row, close the row with a sl st (40 hdc)
R12: *2hdc in nex st, 1hdc in next 4 st* repeat from * to * till end of row, close the row with a sl st (48 hdc)
R13: *1hdc in nex st* repeat from * to * till end of row, close the row with a sl st (48 hdc)
R14: *2hdc in nex st, 1hdc do nasl 5 sl* repeat from * to * till end of row, close the row with a sl st (56 hdc)
R15: *1hdc in nex st* repeat from * to * till end of row, close the row with a sl st (56 hdc)
R16: *2hdc in nex st, 1hdc in next 6 st* repeat from * to * till end of row, close the row with a sl st (64 hdc)
R17: *1po in nex st* repeat from * to * till end of row, (64 po) close the row with a sl st or make an invisible join
Cut the yarn, weave in the ends.
Lay your CROCHET VELVET BUCKET HATS out and smooth down, we have a beautifully warm and cosy bucket hats! I'm very happy with how the hats turned out and I'm looking forward to this hat being pleasantly warm in the fall!
What’s Next?
Pin this post: Save this tutorial to your Pinterest boards so that you can come back to it later.
Leave a comment: I love to hear your feedback. Tell me in the comments below!
Share on Instagram and Facebook: When you make this project, share it on social media and tag me @sonanebeska. I love to see what you make!
You can browse through all of my other FREE crochet HAT's patterns:
More Crochet WINTER patterns?
For even more WINTER crochet patterns, check out my collection.
All of the patterns on that list of beautifully designed, and suitable for both beginners and experienced crocheters.
I would recommend you to match your CROCHET HAT with this beautiful COWL / NECKWARMER
OR WITH THIS LOVELY COCOOC SHRUG CARDIGAN:
Do you love the HAT crocheting? Hats are always good gift ideas. You would may like to try also these patterns:
Explore More Crochet Patterns
If you love to crochet as much as I do, I think you’ll love these other free crochet HAT's patterns for KIDS as well.
♥♥♥
Have fun and let me know what you make. I would love to know how your project turns out.
Please don't forget to like and I really appreciate your comments.
If the pattern did not make sense to you, please don’t hesitate to contact me, I am happy to help :)
If you like this pattern, please follow and share my projects on social networks as a THANK YOU and to help me to create new projects and patterns for you.
Thank you very much once again for your visit and see you soon!
♥♥♥