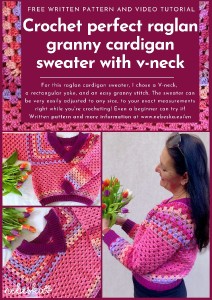
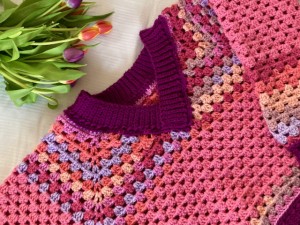
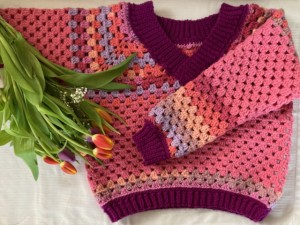
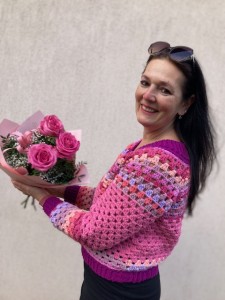
Love granny stitch? Crochet this gorgeous Raglan granny cardigan sweater with v-neck
Beautiful day to my dear, skillful friends!
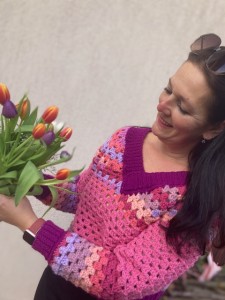
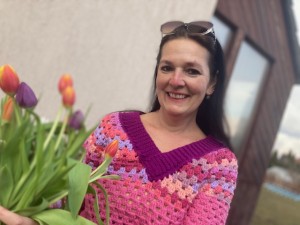
Today, I would love to crochet a wonderful raglan granny cardigan sweater with you, using vibrantly colorful yarns.
I love crocheted sweaters that can be worn throughout the year. This one is great, and truly anyone can crochet it in any size.
I think a crocheted raglan cardigan sweater with a simple granny stitch pattern is exactly what even beginners can handle!
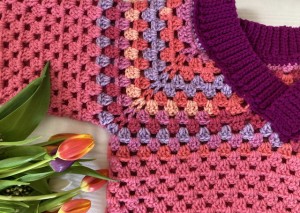
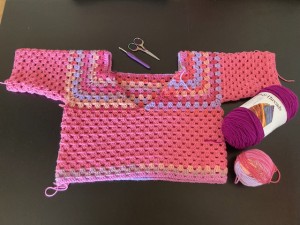
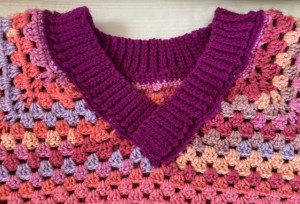
For this raglan cardigan sweater, I chose a V-neck, a rectangular yoke, and an easy granny stitch. The sweater can be very easily adjusted to any size, to your exact measurements right while you're crocheting! Even a beginner can try it! Doesn't that sound amazing?
In my video tutorial, I will guide you through every step of the crocheting process so that you can customize each part to your liking and crochet a fantastic granny raglan cardigan sweater that fits you perfectly.
Whether you prefer an oversized style, a shorter sweater, or you like a fitted sweater, in a cropped length or a maxi long length, following this video tutorial, you can easily create YOUR perfect crocheted granny raglan sweater.
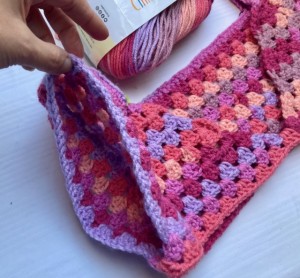
This sweater has a raglan shape with a rectangular yoke, which means that the armholes are incorporated into the yoke in a very simple way.
Once you start crocheting the yoke, you'll be able to crochet the upper part of the cardigan in no time and without much counting, and then it will all go very smoothly.

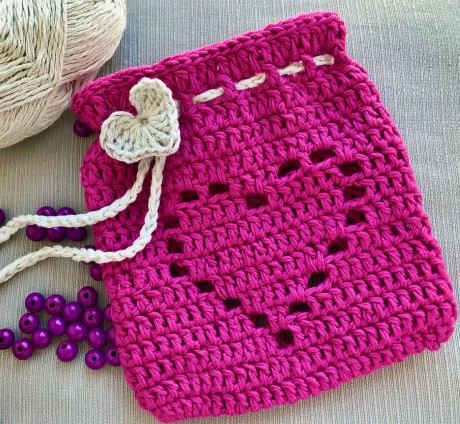
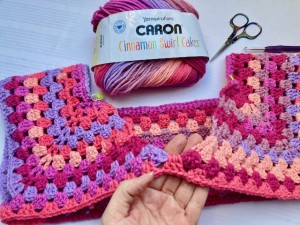
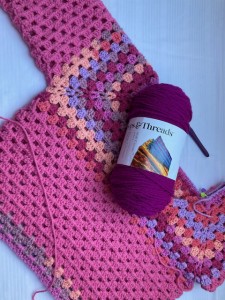
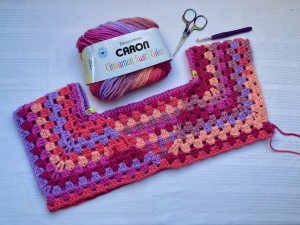
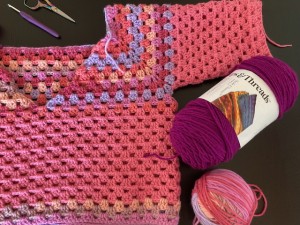
For crocheting, I used 3 different colored skeins – a beautifully variegated Caron multicolor skein and 2 skeins of Loops and Threads – one pink and the other burgundy.
I fell in love with the colors of these yarns. Interesting color transitions that thrilled me, and I think it's precisely these colors that gave the finished product a new flair and style!
The pattern is free again and includes a video tutorial.
Have fun!
VIDEO TUTORIAL
You can find the step-by-step video tutorials below which will help you along if you prefer to watch video instruction rather than using a written pattern. Don’t forget to subscribe if you like me videos, it’s FREE!
![]()
This pattern is made for very beginners and with my video tutorials everyone will manage to crochet this amazing pattern. If you don't understand any of my instructions, don't worry I am here for you - enter the comments at the end of this post.
A huge thanks to everyone who want to support my blog and download PDF paid pattern. Thank you very much, I really appreciate it and it helps me create more new video tutorials and patterns for you. Love you!
![]()
If you pin my patterns to your Favorites and share it on social media as a link, I will be able to share a lot more free crochet patterns for you all.
Stay in touch at Facebook, Instagram and Pinterest.
Let's start or PIN this idea to your Pinterest boards for later.
![]()
If you like to crochet the Granny pattern, I have some more tips for you:
CROCHET EASY GRANNY CARDIGAN
CROCHET TURTLENECK GRANNY PONCHO
CROCHET GRANNY SQUARE HOODED VEST
CROCHET ALPACA GRANNY RAGLAN CARDIGAN
For even more crochet patterns, check out my e-book.
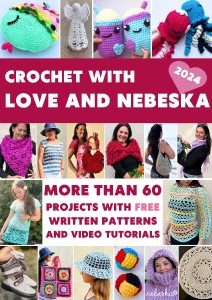
More pattern? CROCHET WITH LOVE AND NEBESKA
I'm thrilled to present my 2024 e-book, CROCHET WITH LOVE AND NEBESKA!
Inside, you'll discover over 60 projects with patterns and video tutorials to inspire you all year long.
You can download the e-book as a PDF, complete with clickable links to easily find the patterns you're looking for. Perhaps you missed a pattern and are now happy to find it here.
Or maybe you're just looking for inspiration for your next project – I hope my ideas spark your creativity! The e-book is FREE and you can share it with your friends.
Due to its size, the e-book is available for download only via the link below (it cannot be sent as an email attachment). Click the link image below to download the CROCHET WITH LOVE AND NEBESKA 2024 and 2023 e-books for FREE!

Have questions? Join the Facebook Group OR my Youtube Community!
I hope this article will be useful for you! If you have any additional questions, feel free to join my Facebook Group or Youtube Community. I created these groups for you to share pictures, ask questions, and help each other out.
CROCHET RAGLAN GRANNY CARDIGAN SWEATER WITH V-NECK
DIRECTIONS
So let me now get started and tell you what you will need in order to crochet this CROCHET RAGLAN GRANNY CARDIGAN SWEATER WITH V-NECK.
This CROCHET RAGLAN GRANNY CARDIGAN SWEATER WITH V-NECK is fun and quick to make.
The pattern uses only basic crochet stitches - slip stitches, single and double crochet stitches and chains.
This easy-to-fit make and memorize pattern - there are just 2 rows made with the basic stitches ONLY!
The sweater is worked from top down and grow row by row.
You can easily change the sizing by making the RAGLAN Sweater smaller or bigger just by making less or more rows.
The CROCHET RAGLAN GRANNY CARDIGAN SWEATER WITH V-NECK is crocheted with yarns:
Caron Cinnamon Swirl Cakes
1 ball: 100 % acrylic
Ball Size: 454 g/16 oz, 372 m/407 yds
Loops and Threads
Soft Classic Acrylic
2 balls
252 yds / 5 oz ( 231 m / 141 g)
Colors:
Color A – multicolor – for sweater and sleeves
Color B – pink - for sweater and sleeves
Color C – dark violet - for ribbing endings
Crochet Hook 5.0 mm
Depending on if you crochet tightly or loosely, you may find that you need to go up or down a hook size.
Scissors, Stitch Markers and tapestry needle: you will also need a yarn needle to weave in the ends, and 4 stitch markers to mark the 4 raglan corner stitches.
Difficulty Level: Level 1 – Easy, for beginners
US crochet terms:
SlSt – slip stitch
CH/s – chain/s
SC - single crochet
DC - double crochet
SK - skip
T - turn
ST/s - stitch(es)
REP - repeat
YO – yarn over
Special stitches used: BLO = back loop only
CROCHET RAGLAN GRANNY CARDIGAN SWEATER WITH V-NECK
PATTERN NOTES
PATTERN NOTES
1. The Crochet Raglan CARDIGAN – size – is crocheted for a women's size M. The cardigan has a classic fit, designed to be worn over a t-shirt or top.
2. The cardigan is crocheted as a simple classic cardigan with a waist-length hem, suitable for year-round wear, a timeless piece for your wardrobe. It is crocheted from the top down, and you can try it on as you go, adjusting the size accordingly.
3. The pattern uses single crochet and double crochet stitches. The double crochet stitches create a very simple granny pattern, and if you're embarking on your first raglan cardigan, this pattern will definitely suit you.
4. In the pattern below, I chose a classic fit, but if you want a fitted style, you can simply crochet a smaller size, and if you want an oversized fit, simply crochet a larger size! You can easily adjust the length of the cardigan by crocheting more rows in the "body" of the cardigan. I crocheted the sweater with 3 strands of yarn - one self-striping and then two solid colors, but you can crochet your sweater in any colors you like.
5. The chain 1 at the beginning of the row does not serve as a replacement for a stitch; the first stitch is always crocheted into the first stitch of the previous row. The chain 3 at the beginning of the row serves as a replacement for a double crochet stitch.
6. The cardigan is crocheted in rows, with gradual increases at the V-neck. The sleeves are crocheted in joined rounds, i.e., the round is joined with a slip stitch after completing the round.
7. The number in parentheses in the pattern is the number of stitches in the row [ ] after crocheting the entire row. If no number is given, it is the same as in the previous row.
How to crochet RAGLAN GRANNY CARDIGAN SWEATER WITH V-NECK
This SWEATER is crocheted from the top down in a raglan style with a rectangular yoke.
I really love this style and construction; the size is then super easy to adjust! One of my favorite things about top-down crocheted sweaters is that you can try them on and adjust the size to your style as you go.
For example, if you find that the underarm area is a bit tight after finishing the yoke, you can simply add a few more joined rounds of the yoke without increasing before dividing for the sleeves and body of the sweater.
And if you want to shorten/lengthen the sweater, you can simply decrease/increase rows until you are happy with the length! The same applies to the sleeves.
This type of raglan construction is also very suitable for beginners who are just trying simple stitches.

CROCHET RAGLAN GRANNY CARDIGAN SWEATER WITH V-NECK
RIBBING
EDGING AND RIBBING
Notes on the Ribbed Edging
Once the sweater is finished and you are satisfied with the length, the last step is the edging around the neckline, the cuffs on the sleeves, and also at the bottom of the sweater – the so-called ribbed pattern. This is crocheted directly onto the last row; you can continue crocheting with the same yarn or choose a different color.
A detailed description is in the written pattern below, and examples are in the video tutorial. I also like to use this ribbed edging finish on my other designs and on hats, so you've probably already seen it in my previous video tutorials.
CROCHET RAGLAN GRANNY CARDIGAN SWEATER WITH V-NECK
CONSTRUCTION
The sweater has these parts:
YOKE – start with a foundation chain so that you have a comfortable neckline, then crochet in rows, gradually increasing the neckline on the front pieces into a V-shape. After crocheting a row, turn your work. The yoke increases at 4 corners; after each increase, the sections (back piece and sleeves) will widen by one granny stitch cluster.
BODY OF THE CARDIGAN – divide the yoke to create armholes, and then simply crochet in rows downwards without increasing, using the same pattern as for the yoke.
Each row of the YOKE AND BODY of the sweater begins and ends on one of the front pieces. The front pieces also widen, but more gradually, creating a comfortable V-neck.
SLEEVES – attach the yarn in the underarm on each side of the cardigan body, and again crochet the sleeves with the same pattern in joined rounds, decreasing gradually towards the wrist. You can also crochet the sleeves without decreasing in a straight style.
To adjust the length of the sweater body or sleeves, simply repeat the last rows until you are satisfied with the length.
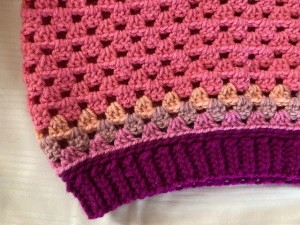
RIBBED EDGING – I decorated the cardigan with a ribbed edge at the bottom and also around the neckline on the front pieces and on the sleeves.

Here are some tips and tricks for crocheters to crochet a perfect granny sweater:
Gauge and Sizing:
· Measure as You Go: Because granny stitch can stretch, especially with certain yarns, lay your pieces flat and measure them periodically as you work to ensure you're on track with the intended size.
· Consider Ease: Sweater patterns usually include "ease," which is the difference between the finished garment measurements and your body measurements. Decide how much ease you prefer (fitted, classic, relaxed, oversized) and choose your size accordingly, or adjust the pattern if you're comfortable.
Granny Stitch Consistency:
· Consistent Tension: Maintaining even tension throughout your project is key for a neat and professional-looking granny sweater. Try to keep your yarn relaxed and your movements consistent.
· Stitch Placement: Be consistent with where you insert your hook for each stitch, especially when working into chain spaces. This will help create a uniform granny square/cluster look.
· Joining Rounds/Rows: Pay attention to how the pattern instructs you to join rounds or turn rows. Consistent joining/turning methods will create cleaner lines in your finished garment.
Colorwork:
· Weaving in Ends: If you're using multiple colors, weave in your ends securely as you go to avoid a massive task at the end.
· Clean Color Changes: When changing colors, do it neatly at the end of a row or round.
Construction Tips:
· Raglan Shaping: For raglan sweaters, pay close attention to the increase rounds/rows to ensure the yoke shapes correctly and the armholes are the right size. Use stitch markers to clearly identify the raglan increase points.
· Trying On As You Go (Top-Down): As mentioned in the pattern, if you're working a top-down sweater, take advantage of the ability to try it on as you go and adjust the length of the body and sleeves to your preference.
Finishing:
· Blocking: Blocking can significantly improve the drape and overall appearance of your finished granny sweater, especially if it's made with natural fibers. Follow the yarn care instructions for appropriate blocking methods (wet blocking, steam blocking).
Specific to Granny Stitch Sweaters:
· Embrace the Gaps: Granny stitch inherently has gaps. This contributes to its drape and breathability. Don't try to make it too dense unless the pattern specifically calls for it.
By keeping these tips in mind, you'll be well on your way to crocheting a beautiful and perfectly fitting granny sweater! Happy crocheting!
CROCHET RAGLAN GRANNY CARDIGAN SWEATER WITH V-NECK
WRITTEN PATTERN
YOKE
Crochet Hook 5.0 mm
Chain 3 at the beginning of the row serves as a double crochet (dc)
Begin with the foundation chain, then work the yoke rows, turn your work when you finish the row.
We will crochet the yoke – we will divide the work into 5 sections and 4 corners.
Foundation chain 83 ch
R1: ch 1, sc 1 in each ch, turn (83 sts) Divide the chain with 83 stitches into 5 sections by placing stitch markers on stitch: 3, 25, 59, and 81. 2 stitches = front panel corner stitch 21 stitches for the sleeve = 5 granny stitch clusters (1 + 4x5) corner stitch 33 stitches for the back panel = 8 granny stitch clusters (1 + 4x8) corner stitch 21 stitches for the sleeve = 6 granny stitch clusters (1 + 4x5) corner stitch 2 stitches = front panel
R2: ch 3, 2 dc in the first st, ch 1, skip 1 st, corner: (dc 1, ch 1, dc 1) in the next st, ch 1, skip 1 st (dc 1 in the next 3 sts, ch 1, skip 1 st) repeat 5 times, corner: (dc 1, ch 1, dc 1) in the next st, ch 1, skip 1 st (dc 1 in the next 3 sts, ch 1, skip 1 st) repeat 8 times, corner: (dc 1, ch 1, dc 1) in the next st, ch 1, skip 1 st (dc 1 in the next 3 sts, ch 1, skip 1 st) repeat 5 times, corner: (dc 1, ch 1, dc 1) in the next st, ch 1, skip 1 st, 3 dc in the last st, turn
R3: ch 3, 2 dc in the first st, ch 1, 3 dc in the next ch-1 sp, ch 1, corner: (dc 1, ch 1, dc 1) in the corner ch-1 sp, ch 1, (3 dc in the next ch-1 sp, ch 1) repeat 6 times, corner: (dc 1, ch 1, dc 1) in the corner ch-1 sp, ch 1, (3 dc in the next ch-1 sp, ch 1) repeat 9 times, corner: (dc 1, ch 1, dc 1) in the corner ch-1 sp, ch 1, (3 dc in the next ch-1 sp, ch 1) repeat 6 times, corner: (dc 1, ch 1, dc 1) in the corner ch-1 sp, ch 1, (3 dc in the next ch-1 sp, ch 1) in the next ch-1 sp, 3 dc in the last st, turn
R4: without adding a granny cluster on the front panel at the neckline ch 3, ch 1, (3 dc in the next ch-1 sp, ch 1) repeat 2 times corner: (dc 1, ch 1, dc 1) in the corner ch-1 sp, ch 1, (3 dc in the next ch-1 sp, ch 1) repeat 7 times, corner: (dc 1, ch 1, dc 1) in the corner ch-1 sp, ch 1, (3 dc in the next ch-1 sp, ch 1) repeat 10 times, corner: (dc 1, ch 1, dc 1) in the corner ch-1 sp, ch 1, (3 dc in the next ch-1 sp, ch 1) repeat 7 times, corner: (dc 1, ch 1, dc 1) in the corner ch-1 sp, ch 1, (3 dc in the next ch-1 sp, ch 1) repeat 2 times, 1 dc in the last st, turn
R5: ch 3, 2 dc in the first st, ch 1, (3 dc in the next ch-1 sp, ch 1) repeat 2 times corner: (dc 1, ch 1, dc 1) in the corner ch-1 sp, ch 1, (3 dc in the next ch-1 sp, ch 1) repeat 8 times, corner: (dc 1, ch 1, dc 1) in the corner ch-1 sp, ch 1, (3 dc in the next ch-1 sp, ch 1) repeat 11 times, corner: (dc 1, ch 1, dc 1) in the corner ch-1 sp, ch 1, (3 dc in the next ch-1 sp, ch 1) repeat 8 times, corner: (dc 1, ch 1, dc 1) in the corner ch-1 sp, ch 1, (3 dc in the next ch-1 sp, ch 1) repeat 2 times, 3 dc in the last st, turn
R6: ch 3, 2 dc in the first st, ch 1, (3 dc in the next ch-1 sp, ch 1) repeat 3 times corner: (dc 1, ch 1, dc 1) in the corner ch-1 sp, ch 1, (3 dc in the next ch-1 sp, ch 1) repeat 9 times, corner: (dc 1, ch 1, dc 1) in the corner ch-1 sp, ch 1, (3 dc in the next ch-1 sp, ch 1) repeat 12 times, corner: (dc 1, ch 1, dc 1) in the corner ch-1 sp, ch 1, (3 dc in the next ch-1 sp, ch 1) repeat 9 times, corner: (dc 1, ch 1, dc 1) in the corner ch-1 sp, ch 1, (3 dc in the next ch-1 sp, ch 1) repeat 3 times, 3 dc in the last st, turn
R7: ch 3, 2 dc in the first st, ch 1, (3 dc in the next ch-1 sp, ch 1) repeat 4 times corner: (dc 1, ch 1, dc 1) in the corner ch-1 sp, ch 1, (3 dc in the next ch-1 sp, ch 1) repeat 10 times, corner: (dc 1, ch 1, dc 1) in the corner ch-1 sp, ch 1, (3 dc in the next ch-1 sp, ch 1) repeat 13 times, corner: (dc 1, ch 1, dc 1) in the corner ch-1 sp, ch 1, (3 dc in the next ch-1 sp, ch 1) repeat 10 times, corner: (dc 1, ch 1, dc 1) in the corner ch-1 sp, ch 1, (3 dc in the next ch-1 sp, ch 1) repeat 4 times, 3 dc in the last st, turn
R8: without adding a granny cluster on the front panel at the neckline ch 3, ch 1, (3 dc in the next ch-1 sp, ch 1) repeat 5 times corner: (dc 1, ch 1, dc 1) in the corner ch-1 sp, ch 1, (3 dc in the next ch-1 sp, ch 1) repeat 11 times, corner: (dc 1, ch 1, dc 1) in the corner ch-1 sp, ch 1, (3 dc in the next ch-1 sp, ch 1) repeat 14 times, corner: (dc 1, ch 1, dc 1) in the corner ch-1 sp, ch 1, (3 dc in the next ch-1 sp, ch 1) repeat 11 times, corner: (dc 1, ch 1, dc 1) in the corner ch-1 sp, ch 1, (3 dc in the next ch-1 sp, ch 1) repeat 5 times, 1 dc in the last st, turn
R9: ch 3, 2 dc in the first st, ch 1, (3 dc in the next ch-1 sp, ch 1) repeat 5 times corner: (dc 1, ch 1, dc 1) in the corner ch-1 sp, ch 1, (3 dc in the next ch-1 sp, ch 1) repeat 12 times, corner: (dc 1, ch 1, dc 1) in the corner ch-1 sp, ch 1, (3 dc in the next ch-1 sp, ch 1) repeat 15 times, corner: (dc 1, ch 1, dc 1) in the corner ch-1 sp, ch 1, (3 dc in the next ch-1 sp, ch 1) repeat 12 times, corner: (dc 1, ch 1, dc 1) in the corner ch-1 sp, ch 1, (3 dc in the next ch-1 sp, ch 1) repeat 6 times, 3 dc in the last st, turn
R10: ch 3, 2 dc in the first st, ch 1, (3 dc in the next ch-1 sp, ch 1) repeat 6 times corner: (dc 1, ch 1, dc 1) in the corner ch-1 sp, ch 1, (3 dc in the next ch-1 sp, ch 1) repeat 13 times, corner: (dc 1, ch 1, dc 1) in the corner ch-1 sp, ch 1, (3 dc in the next ch-1 sp, ch 1) repeat 16 times, corner: (dc 1, ch 1, dc 1) in the corner ch-1 sp, ch 1, (3 dc in the next ch-1 sp, ch 1) repeat 13 times, corner: (dc 1, ch 1, dc 1) in the corner ch-1 sp, ch 1, (3 dc in the next ch-1 sp, ch 1) repeat 6 times, 3 dc in the last st, turn
R11: ch 3, 2 dc in the first st, ch 1, (3 dc in the next ch-1 sp, ch 1) repeat 7 times corner: (dc 1, ch 1, dc 1) in the corner ch-1 sp, ch 1, (3 dc in the next ch-1 sp, ch 1) repeat 14 times, corner: (dc 1, ch 1, dc 1) in the corner ch-1 sp, ch 1, (3 dc in the next ch-1 sp, ch 1) repeat 17 times, corner: (dc 1, ch 1, dc 1) in the corner ch-1 sp, ch 1, (3 dc in the next ch-1 sp, ch 1) repeat 14 times, corner: (dc 1, ch 1, dc 1) in the corner ch-1 sp, ch 1, (3 dc in the next ch-1 sp, ch 1) repeat 7 times, 3 dc in the last st, turn
Measurements:
Width: 46 cm
Height: 14 cm
Armholes: 19 cm
V-neck depth: 19 cm
BODY OF THE CARDIGAN
R12: ch 3, 2 dc in the first st, ch 1, (3 dc in the next ch-1 sp, ch 1) repeat 8 times skip the corner stitch, the sleeve section (15 clusters), and the next corner stitch (3 dc in the next ch-1 sp, ch 1) repeat 18 times, skip the corner stitch, the sleeve section (15 clusters), and the next corner stitch (3 dc in the next ch-1 sp, ch 1) repeat 8 times, 3 dc in the last st, Join the two neckline parts: slip stitch into the 3rd chain at the beginning of the row Cut the yarn.
Attach new yarn at the side of the sweater
R13: ch 3, 2 dc in the ch-1 sp, ch 1, (3 dc in the next ch-1 sp, ch 1) repeat 35 times to the end of the round, join with a slip stitch to the 3rd chain at the beginning of the round, turn Color B R14: ch 3, 2 dc in the ch-1 sp, ch 1, (3 dc in the next ch-1 sp, ch 1) repeat 35 times to the end of the round, join with a slip stitch to the 3rd chain at the beginning of the round, turn Repeat Row R14 until you are satisfied with the length of your cardigan sweater. I crocheted 15 more rows. I crocheted the last 3 rows with Color A.
SLEEVE
Attach yarn at the armhole opening
Hook 5.0 mm
R1: ch 3, 2 dc in the ch-1 sp, ch 1, (3 dc in the next ch-1 sp, ch 1) repeat to the end of the round, join with a slip stitch to the 3rd chain from the beginning of the round, turn (14 granny clusters) R2: ch 3, 2 dc in the ch-1 sp, ch 1, (3 dc in the next ch-1 sp, ch 1) repeat to the end of the round, join with a slip stitch to the 3rd chain from the beginning of the round, turn Repeat Row R2 until you are satisfied with the length of the sleeve.
If you want to taper the sleeve, I recommend this method: Crochet the granny pattern until there are 2 ch-1 spaces left in the round. In the second to last space, crochet 1 dc, then 1 dc decrease (dc2tog) worked with a dc in the next ch-1 sp, 1 dc in the same ch-1 sp. Join with a slip stitch to the 3rd chain from the beginning of the round, turn. In my pattern, I changed colors: B Color B: R1 - R14 I decreased a total of 3 times gradually in rows: R5, R10, R14. Color A: R15 - R27 without decreasing. I finished the sleeve with 11 granny clusters.
Repeat the instructions and crochet the sleeve on the opposite side. Cut the yarn and weave in the loose ends. In my pattern, I crocheted 27 rows.
EDGING – RIBBED PATTERN
NECKLINE EDGING
Note: The ribbed edging is crocheted at a right angle to the V-neck slope. It is crocheted onto the first row of the CARDIGAN.
You can continue with the same yarn or change color.
In my pattern, I chose a striking purple color – Color C.
I crocheted one row of slip stitches and simultaneously single crochets around the neckline, and then I crocheted the ribbing. Around the double crochet stitches, I crocheted 2 stitches. On the back neck, 1 stitch in each stitch.
R1: ch 1, sc 1 in each st to the end of the round, join with a slip stitch to the first st.
Ribbed Pattern: R1 (row perpendicular to Row R1 with decreases): ch 8, ch 1 to turn, sl st 1 in the 2nd ch from the hook and sl st 1 in each ch to the end of the row, where you attach to Row R1 (8 sl st), sl st in the next st in Row R1 and join the crocheted part with the ribbed pattern to the cardigan.
R2: sl st in the next st in Row R1, ch 1, turn. Skip ch 1 and 2 sl st, sl st BLO in the next 8 sts to the end of the row (8 sl st), turn.
R3: ch 1, sl st BLO in the next 8 sts (8 sl st), sl st and again join with the cardigan.
Repeat Rows R2 and R3 all the way around, along Row R1, each row of ribbing will be joined with one stitch in Row R1. Cut the yarn and weave in the loose ends. Sew the neckline so that the crocheted strips overlap at the front.
SLEEVE - BOTTOM EDGE
Note: The ribbed edging is crocheted at a right angle to the last row of the sleeve. It is crocheted onto the last row of the sleeve. You can continue with the same yarn or change color.
In my pattern, I chose the same striking purple color - Color C - that I already used for the neckline.
I crocheted one row of slip stitches and simultaneously single crochets around the bottom row - 1 stitch in each stitch, I do not crochet into the chain spaces.
R1: ch 1, repeat: sc 1 in the next 3 sts, skip ch to the end of the round, join with a slip stitch to the first st. Then I crocheted the ribbing.
R1 (row perpendicular to Row R1 with decreases): ch 8, ch 1 to turn, sl st 1 in the 2nd ch from the hook and sl st 1 in each ch to the end of the row, where you attach to Row R1 (8 sl st), sl st in the next st in Row R1 and join the crocheted part with the ribbed pattern to the cardigan.
R2: sl st in the next st in Row R1, ch 1, turn. Skip ch 1 and 2 sl st, sl st BLO in the next 8 sts to the end of the row (8 sl st), turn. R3: ch 1, sl st BLO in the next 8 sts (8 sl st), sl st and again join with the cardigan.
Repeat Rows R2 and R3 all the way around, along Row R1, each row of ribbing will be joined with one stitch in Row R1.
Finishing: Slip stitch the first and last rows of the ribbed pattern together. Cut the yarn and weave in the loose ends.
SWEATER - BOTTOM EDGE
Note: The ribbed edging is crocheted at a right angle to the body of the sweater.
It is crocheted onto the last row of the CARDIGAN.
You can continue with the same yarn or change color.
In my pattern, I chose the same striking purple color - Color C - that I already used for the neckline and the cuffs on the sleeves.
I crocheted one row of slip stitches and simultaneously single crochets around the bottom row - 1 stitch in each stitch, I do not crochet into the chain spaces.
R1: ch 1, repeat: sc 1 in the next 3 sts, skip ch to the end of the round, join with a slip stitch to the first st. Total of 108 single crochet stitches. Then I crocheted the ribbing.
R1 (row perpendicular to Row R1 with decreases): ch 6, ch 1 to turn, sl st 1 in the 2nd ch from the hook and sl st 1 in each ch to the end of the row, where you attach to Row R1 (6 sl st), sl st in the next st in Row R1 and join the crocheted part with the ribbed pattern to the cardigan.
R2: sl st in the next st in Row R1, ch 1, turn. Skip ch 1 and 2 sl st, sl st BLO in the next 6 sts to the end of the row (6 sl st), turn. R3: ch 1, sl st BLO in the next 6 sts (6 sl st), sl st and again join with the cardigan.
Repeat Rows R2 and R3 all the way around, along Row R1, each row of ribbing will be joined with one stitch in Row R1.
Finishing: Slip stitch the first and last rows of the ribbed pattern together. Cut the yarn and weave in the loose ends.
I hope you’ve enjoyed making this CROCHET RAGLAN GRANNY CARDIGAN SWEATER WITH V-NECKCROCHET crochet pattern.

What’s Next?
Pin this post: Save this tutorial to your Pinterest boards so that you can come back to it later.
Leave a comment: I love to hear your feedback. Tell me in the comments below!
Share on Instagram and Facebook: When you make this project, share it on social media and tag me @sonanebeska. I love to see what you make!
Explore More Crochet Patterns
If you love to crochet as much as I do, I think you’ll love these other free crochet patterns for boys.
MORE PATTERN?
Just click on them and you can find the free pattern, each of the patterns comes with a video tutorial.
You know me, I love making SCOODIES and CARDIGANS for me or for my friends and for my family. If you do as well, you may would love to try these patterns as well. They are different levels of difficulties and techniques that you might have never seen before.
More Crochets for KIDS? Please check out my collection: https://www.nebeska.eu/en/articles/crochet-patterns-and-tutorials/for-babies-and-kids/
I also created a playlist on my YouTube Channel "For Babies and Kids":
All of the patterns on that list are beautifully designed, and suitable for both beginners and experienced crocheters. They are different levels of difficulties and techniques that you might have never seen before. Just click on them and you can find the free pattern, each of the patterns comes with a video tutorial.
Have fun and let me know what you make. I would love to know how your project turns out.
Please don't forget to like and I really appreciate your comments.
If the pattern did not make sense to you, please don’t hesitate to contact me, I am happy to help :)
If you like this pattern, please follow and share my projects on social networks as a THANK YOU and to help me to create new projects and patterns for you.
If you pin my patterns to your Favorites and share it on social media as a link, I will be able to share a lot more free crochet patterns for you all.
Stay in touch at Facebook, Instagram and Pinterest.
Thank you very much once again for your visit and see you soon!
♥♥♥