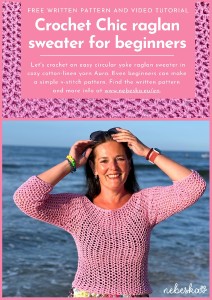
Crochet Mesh Raglan Sweater AURA with circular yoke
Hello everyone!
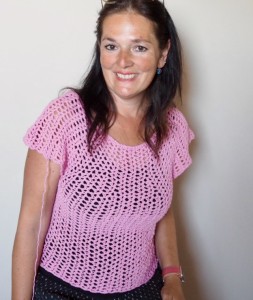
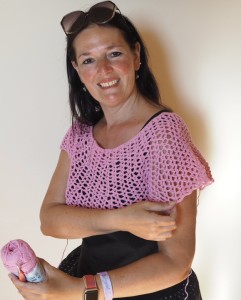
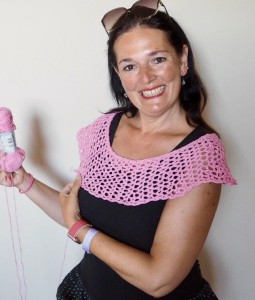
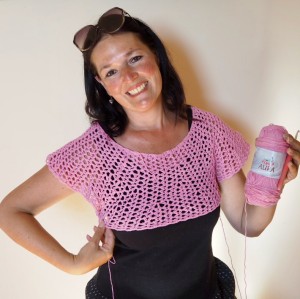
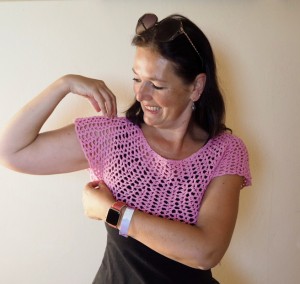
Who else loves crocheting simple, breezy mesh sweaters? If you know me, you know I’m all about these kinds of sweaters! That’s why I couldn’t resist choosing a mesh pattern for this one too. This versatile piece can be worn over a tank top or t-shirt, making it perfect for year-round wear.

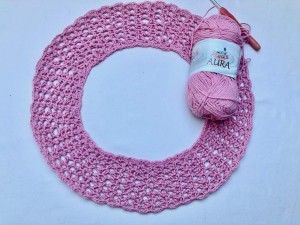
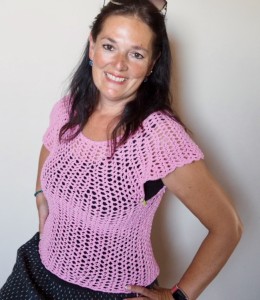
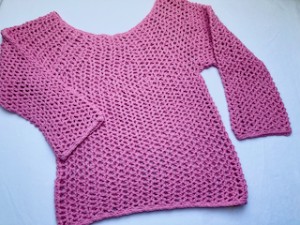
This time, I decided to crochet the sweater from the top down, starting with a circular yoke in a raglan style. The pattern is super easy—my go-to v-stitch mesh that’s so simple to remember and a joy to crochet.
What’s fantastic about this mesh sweater is how easily it can be adjusted to fit any size or style. It’s a timeless piece, and you can effortlessly make it bigger or smaller, so everyone can have one of these fabulous wardrobe essentials!
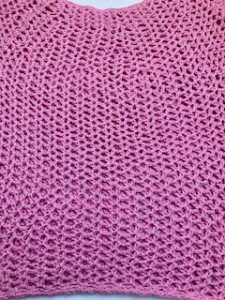
I used the coziest Aura yarn, a lovely cotton and linen blend, and I couldn’t resist the soft powder pink color—it was love at first sight!
I hope you enjoy crocheting and wearing this delightful linen sweater as much as I do.
This sweater is designed as a simple top-down raglan, starting from the circular yoke. The sleeves are crocheted directly onto the sweater.
While I’ve provided instructions for an S/M size, you can easily adjust the length, width, or fit—making it perfect for beginners and a truly customizable project.
VIDEO TUTORIALS
You can find the step-by-step video tutorials below which will help you along if you prefer to watch video instruction rather than using a written pattern. Don’t forget to subscribe if you like me videos, it’s FREE!
PART ONE: YOKE
PART TWO: THE BODY OF SWEATER, SLEEVES, BORDER
![]()
If you pin my patterns to your Favorites and share it on social media as a link, I will be able to share a lot more free crochet patterns for you all.
Stay in touch at Facebook, Instagram and Pinterest.
Let's start or PIN this idea to your Pinterest boards for later.
![]()
For even more crochet patterns, check out my e-book.
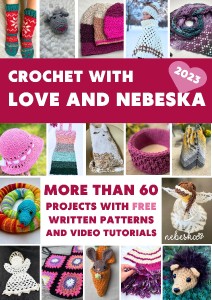
CROCHET WITH LOVE AND NEBESKA
I prepared for you the e-book CROCHET WITH LOVE AND NEBESKA, it is a set of more than 60 projects with instructions and video instructions for the whole year 2023!
You can download the e-book as a pdf with links to allow you to better find the guide you need. Or maybe you missed one of the pattern instructions and now it will make you happy, or you are just looking for inspiration and one of my ideas will move you in your next creation!
This e-book is FREE and you can share it with your friends. Due to the size, it is necessary to download CROCHET WITH LOVE AND NEBESKA from the link (it cannot be sent as an e-mail attachment). Click on the ebook link or image and download the e-book CROCHET WITH LOVE AND NEBESKA 2023 for FREE.
https://forms.gle/CyJZqXs4fTWechtE6
All of the patterns on that list of beautifully designed, and suitable for both beginners and experienced crocheters. They are different levels of difficulties and techniques that you might have never seen before. Just click on them and you can find the free pattern, each of the patterns comes with a video tutorial.
CROCHET MESH RAGLAN SWEATER AURA
This SWEATER is perfect for beginners, featuring a simple V-stitch pattern of half-double crochets and chain stitches.
All you need is a basic understanding of crocheting, as everything is clearly explained in the step-by-step instructions below and demonstrated in detail in the accompanying video tutorial.
If you have any questions regarding the instructions, don't hesitate to reach out to me. I am here to help!
Have questions? Join the Facebook Group OR my Youtube Community!
I hope this article will be useful for you! If you have any additional questions, feel free to join my Facebook Group or Youtube Community. I created these groups for you to share pictures, ask questions, and help each other out.
CROCHET MESH RAGLAN SWEATER AURA
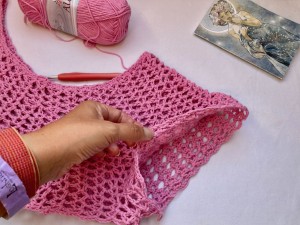
This sweater has a simple pattern and crocheting is easy and fun! I believe you will enjoy crocheting a circular yoke on the top of the sweater and then the mesh pattern.
The sweater is crocheted from the yoke with mesh v-stitch pattern, from top to bottom, in rows, and the parts grow very quickly.
If you want to adjust the size, you just change the number of rows and the number of v-stitches in a row.
I believe that even a beginner can try crocheting a raglan style mesh sweater.
CROCHET MESH RAGLAN SWEATER AURA
MATERIALS
What will you need to crochet this Sweater?
The Sweater is crocheted using yarn: AURA
Yarn Details:
Available at: https://www.vlnika.cz/z25399-prize-aura
100 g / 170 m,
51% cotton a 49% linen
You need 3 balls to make this beautiful sweater.
![]()
You'll also need:
Hook: 4.5 mm
Sewing needle
Markers for marking 4 corners
Scissors
With these materials on hand, you'll be all set to start crocheting your stylish sweater!
Difficulty Level: Level 1 – Easy, for beginners
US crochet terms:
SlSt – slip stitch
CH/s – chain/s
SC - single crochet
HDC - double crochet
SK - skip
T - turn
ST/s - stitch(es)
REP – repeat
CROCHET MESH RAGLAN SWEATER AURA
PATTERN NOTES
1) The Crochet Sweater is available in S/M women size. The sweater features a flexible pattern and adjusts nicely to the wearer's figure.
2)The Sweater is crocheted in a simple style from top to bottom, allowing you to try on the fit as you crochet and adjust the size accordingly.
3)The instructions use V-stitches to create a simple mesh pattern. If you're new to crocheting sweater, you'll find this pattern easy to follow.
4)While the tutorial demonstrates a classic style, you can easily achieve a body fit by crocheting a size down or oversizes style by crocheting a size up.
5) Additionally, you can adjust the length of the sweater by crocheting more rows in the "body" section after joining the front and back pieces. You can also adjust the length of the sleeves, crocheting more or less rows, until the desired length.
6) A Ch 2 at beg of the row counts as a stitch, start every row with ch2 on the yoke and the body.
7)This sweater is crocheted in rounds. Rounds are joined with slip stitches after completing each row.
8) Measurement:
Neck circumference: 80 cm / 31 inch
Length of sweater: 53 cm / 20.7 inch
Length of body of sweater: 33 cm / 13 inch
Width of sweater: 41 cm / 16 inch
Yoke lenght: 20 cm / 8 inch
Width of sleeve / armpit: 17 cm / 6.6 inch
Length of sleeve from top: 53 cm / 20.7 inch
Length of sleeve from armpit: 33 cm / 13 inch
Width of sleeve - bottom border: 13 cm / 5 inch
*Measurements are taken from the garment lying flat, before the yarn has stretched out/dropped.
How to crochet this sweater:
This sweater is worked seamlessly from the top down, starting with circular yoke.
I really love this type of construction, the size is super easy to adjust!
One of the great things about top-down crochet is that you can try them on as you go and adjust the size to your liking. For instance, if you find the underarm area too tight after completing the yoke, simply add a few more closed yoke rows before dividing into the sleeves and body of the top.
Similarly, if you want to change the length of the sweater or sleeves, you can easily do so by subtracting or adding rows until you're satisfied. This type of raglan construction is perfect for beginners looking to try simple patterns.

CROCHET MESH RAGLAN SWEATER AURA - CONSTRUCTION
The top consists of the following parts:
YOKE – Begin with the foundation chain to create a neckline around the neck. Crochet in rows, gradually widening the neckline around.
Keep crocheting on the right side without turning the work. The yoke expands gradually around.
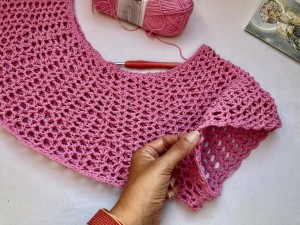
BODY OF THE SWEATER – We will begin by dividing the yoke to create the armholes, then proceed to crochet down the rows without further expansion.
To adjust the length of the top's body or the sleeves, simply repeat the last rows until you reach your desired length.
BOTTOM BORDER – The border is crocheted around in the lower part of the sweater. You can adjust its length as needed or expand it if necessary
CROCHET MESH RAGLAN SWEATER AURA
WRITTEN PATTERN
YOKE
Crochet hook 4.5 mm
ch2 at beg of row = halfdouble crochet
work in rounds, don’t turn your work
close the round with a slip stitch
Make a foundation chain.
Foundation Chain: 111 chains
Close the chain with a slip st.
The number of chains is a multiple of 3.
BORDER: ch1, 1sc in each ch till end of row, my recommendation is to work on the third loop / bump. Turn. (111 sc)

V-stitch = hdc + ch3 + hdc
R1: ch2 (hdc)+ch3+hdc in 1st st, *skip 2 st, V-stitch in next st* repeat from * to * till end of row, close the round with sl st in 2nd ch from beg (37 V-stitches).
R2: 1sl st in next st, ch2 (hdc)+ch3+hdc in chsp, *V-stitch in next chsp* repeat from * to * till end of row, close the round with sl st in 2nd ch from beg (37 V-stitches)
R3 = R2
R4 = increase in each 4th V-st, evenly 9 times around
increase = (hdc+ch3+hdc+ch3+hdc) in V-st from previous row
1sl st in next st, ch2 (hdc)+ch3+hdc in chsp, *(hdc+ch3+hdc+ch3+hdc) in next chsp, V-stitch in next 3 chsp* repeat from * to * till end of row, close the round with sl st in 2nd ch from beg (46 V-stitches)
R5 – R7 = V-stitch in V-st / no increase
R8 = increase in each 4th V-st, evenly 12 times around
increase = (hdc+ch3+hdc+ch3+hdc) in V-st from previous row
1sl st in next st, ch2 (hdc)+ch3+hdc in chsp, *(hdc+ch3+hdc+ch3+hdc) in next chsp, V-stitch in next 3 chsp* repeat from * to * till end of row, close the round with sl st in 2nd ch from beg (58 V-stitches)
R9 - R11 = V-stitch in V-st / no increase
R12 = increase in each 4th V-st, evenly 14 times around
increase = (hdc+ch3+hdc+ch3+hdc) in V-st from previous row
1sl st in next st, ch2 (hdc)+ch3+hdc in chsp, *(hdc+ch3+hdc+ch3+hdc) in next chsp, V-stitch in next 3 chsp* repeat from * to * till end of row, close the round with sl st in 2nd ch from beg (72 V-stitches)
R13-R15 = V-stitch in V-st / no increase
Repeat row R13 till you are satisfied with the length of the yoke.
I made 15 rounds.
Then divide the yoke into 4 parts into 4 quarters:
Front and back panel
Sleeves
72 / 4 = 18
Each part measures 18 v-stitches.
THE BODY of THE SWEATER
R1: work in first 18 v-stitches /back panel/ then ch3 for an armhole, skip 18 v-stitches /sleeve/ work 18 v-stitches /front panel/, armhole ch3, skip 18 v-stitches /sleeve/ close the round with sl st in 2nd ch from beg (36 V-stitches)
R2: work v-stitch in each v-stitch till you reach the armhole ch3 space, in 2nd ch work
(hdc+ch3+hdc), then work v-stitch in v-stitch till you reach the armhole ch3 space, in 2nd ch work (hdc+ch3+hdc), close the round with sl st in 2nd ch from beg (38 V-stitches)
R3: v-stitch in v-stitch
REPEAT R3 till you are satisfied with the length of the body of the sweater (38 V-stitches)
I made 23 rounds.
If you want to make your sweater wide, use INCREASE STITCH (hdc+ch3+hdc+ch3+hdc) in V-stitch from previous round
If you want to make your sweater narrower, use DECREASE STITCH: v-stitch in v-stitch, hdc in next v-stitch, v-stitch in next v-stitch. And in next round work just v-stitch in v-stitch and skip hdc.
BOTTOM BORDER
1sl st in next st, ch1, 1sc in 1st v-stitch, ch2, *1sc in next v-stitch, ch2* repeat from * to * till end of round, close the round with sl st in 1st sc at beg (38 sc and chsp)
ch1, 1sc in 1st sc, 1sc in next 2 ch, *1sc in next sc, 1sc in next 2 ch* repeat from * to * till end of round, close the round with an invisible join or a sl st in 1st sc at beg (114 sc)
Cut the yarn and fasten off.
SLEEVES
Work in closed rounds.
Work on the right side, don’t turn your work.
R1: Re-join a new yarn in armhole. I would recommned you to start working in 2nd ch in chain space armhole, work on the opposite side of the chain (in the same chain, where we already crocheted the v-stitch in the first round of the body of the sweater.
Then make one more v-stitch in chain space between the the body of the sweater and the sleeve.
The v-stitch in v-stitch around (18 v-stitches) till end of round, there make one more v-stitch between the the body of the sweater and the sleeve.
Close the round with sl st in 2nd ch from beg (21 v-stitches).
If you want to make the sleeve narrower, use DECREASE STITCH: v-stitch in v-stitch, hdc in next v-stitch, v-stitch in next v-stitch. And in next round work just v-stitch in v-stitch and skip hdc.
R2: 1sl st in next st, ch2 (hdc)+ch3+hdc in chsp, 1hdc in next chsp, then work v-stitch in v-stitch till end of round, in last v-stitch work 1hdc, close the round with sl st in 2nd ch from beg(19 v-stitches)
R3: work v-stitch in v-stitch
R4: DECREASE STITCH
1sl st in next st, ch2 (hdc)+ch3+hdc in chsp, 1hdc in next chsp, then work v-stitch in v-stitch till end of round, close the round with sl st in 2nd ch from beg (18 v-stitches)
R5: work v-stitch in v-stitch
R6: DECREASE STITCH
1sl st in next st, ch2 (hdc)+ch3+hdc in chsp, 1hdc in next chsp, then work v-stitch in v-stitch till end of round, close the round with sl st in 2nd ch from beg (17 v-stitches)
R7: work v-stitch in v-stitch
R8: DECREASE STITCH
1sl st in next st, ch2 (hdc)+ch3+hdc in chsp, 1hdc in next chsp, then work v-stitch in v-stitch till end of round, close the round with sl st in 2nd ch from beg (16 v-stitches)
R9: work v-stitch in v-stitch
R10: DECREASE STITCH
1sl st in next st, ch2 (hdc)+ch3+hdc in chsp, 1hdc in next chsp, then work v-stitch in v-stitch till end of round, close the round with sl st in 2nd ch from beg (15 v-stitches)
R9 - R23: work v-stitch in v-stitch (15 v-stitches)
I slightly narrowed the sleeve in the armpit area by one v-stitch in every 2nd row.
Use the DECREASE STITCH
REPEAT rounds R9 till you are satisfied with the length of the sleeve (15 V-stitches)
I made 23 rows
BOTTOM BORDER
1sl st in next st, ch1, 1sc in 1st v-stitch, ch2, *1sc in next v-stitch, ch2* repeat from * to * till end of round, close the round with sl st in 1st sc at beg (15sc and chsp)
ch1, 1sc in 1st sc, 1sc in next 2ch, *1sc in next sc, 1sc in next 2 ch* repeat from * to * till end of round, close the round with an invisible join or a sl st in 1st sc at (45 sc)
Cut the yarn and fasten off.
Work the sleeves in the same way on the opposite side. And now all that remains is to sew all the loose ends to the wrong side and turn the sweater to the right front side and align it.
The crochet mesh sweater AURA is now complete! I hope you'll enjoy wearing it not only on summer days but throughout the year as well! I truly believe it will complement you wonderfully.

What’s Next?
Pin this post: Save this tutorial to your Pinterest boards so that you can come back to it later.
Leave a comment: I love to hear your feedback. Tell me in the comments below!
Share on Instagram and Facebook: When you make this project, share it on social media and tag me @sonanebeska. I love to see what you make!
MORE PATTERNS?
Explore More Crochet Patterns
If you love to crochet as much as I do, I think you’ll love these other free crochet DRESSES and TUNICS patterns ❤️
Do you crochet HATS? You may would like to try these popular video tutorials:
You know me, I love making PONCHOS, VESTS and CARDIGANS.
If you do as well, you may would love to try these patterns as well:
♥♥♥
Have fun and let me know what you make. I would love to know how your project turns out.
Please don't forget to like and I really appreciate your comments.
If the pattern did not make sense to you, please don’t hesitate to contact me, I am happy to help :)
If you like this pattern, please follow and share my projects on social networks as a THANK YOU and to help me to create new projects and patterns for you.
Thank you very much once again for your visit and see you soon!
♥♥♥