Crochet Fun: Create a Bright and Cheerful Cover for a Plastic Bag Using Yarn Scraps
Hello! As you know, bags, rucksacks, sacks, purses, and net bags are my absolute favorite things to crochet. They make perfect gifts not only for friends and family but, as I always say, a crocheted gift can bring joy to anyone!
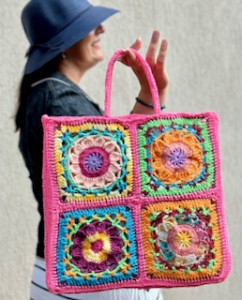
Today, I have something a little different for you: a crocheted cover for an already purchased plastic bag. The bag has dimensions of 35x30 cm, so it was all about measuring the squares correctly. Crochet these into a rectangle, then work on the sides, the bottom, and the top edge. Finally, add the handles and voilà – your colorful cheerful summer bag is complete!
This bag has a wonderfully simple construction where you just stack and crochet the squares together.
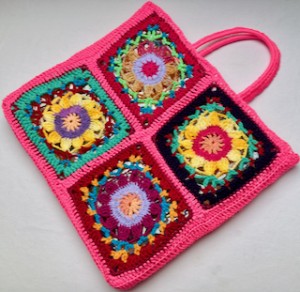
I used various yarn scraps to create a very colorful, cheerful combination – not a single square is the same! For coordination, I crocheted the last row of each square in the same color.
There are so many beautiful yarns and colors available, so feel free to mix and match or go for a monochromatic look.
Each square is the same size, featuring a lovely flower pattern in the middle to really give that summery vibe. The square has 7 rows, with chain stitches, single, and double crochets, making it perfect for beginners. No special knowledge is needed – everything is explained and shown in detail in the video tutorial.
Let’s get crocheting and make some beautiful colorful summer bags together!
VIDEO TUTORIAL
You can find the step-by-step video tutorials below which will help you along if you prefer to watch video instruction rather than using a written pattern. Don’t forget to subscribe if you like me videos, it’s FREE!
![]()
This pattern is made for very beginners and with my video tutorials everyone will manage to crochet this amazing pattern. If you don't understand any of my instructions, don't worry I am here for you - enter the comments at the end of this post.
A huge thanks to everyone who want to support my blog and download PDF paid pattern. Thank you very much, I really appreciate it and it helps me create more new video tutorials and patterns for you. Love you!
![]()
If you pin my patterns to your Favorites and share it on social media as a link, I will be able to share a lot more free crochet patterns for you all.
Stay in touch at Facebook, Instagram and Pinterest.
Let's start or PIN this idea to your Pinterest boards for later.
![]()
COLORFUL CROCHET BAG COVER WITH FLOWER SQUARES
This pattern is made for beginners - only a basic skill level is required to make it. If you don't understand any of my instructions, don't worry I am here for you.
Have questions? Join the Facebook Group!
I hope this article will be useful for you! If you have any additional questions, feel free to join my Facebook Group. I created this group for you to share pictures, ask questions, and help each other out.
So let me now get started and tell you what you will need in order to crochet this COLORFUL CROCHET BAG COVER WITH FLOWER SQUARES.
PATTERN DIRECTIONS
This bag pattern is perfect for beginners, we crochet a simple square - we crochet a total of 8. We put the squares together, sew or crochet and crochet the sides, the bottom part and the top edge. At the end crochet the handles.
Terezka, Alize Diva a Alize Bella, Orion, Tera, Xena, Doly Ombre and others.
If you want a very colorful bag, I recommend choosing at least 9 different colors: 7 colors per square (one color for each row), 1 color for joining squares, and 1 color for the sides and bottom.
You can also crochet a one color bag. The choice of color is up to you, your favorite tones and purely your imagination.
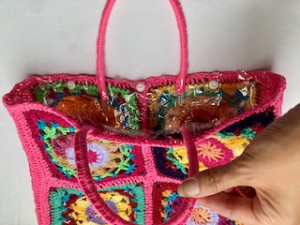
You will need also a plastic bag.
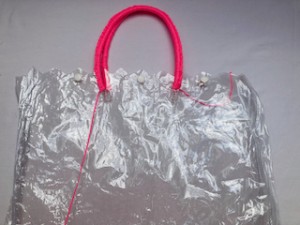
This gives you an original bag with a strong and waterproof interior, which also has 3 snap fasteners.
Bag size:
Width: 35 cm
Length: 30 cm
Length of handle: 12 cm
scissors and tapestry needle.
2) end each round with a slip stitch in the 1st stitch or 3rd ch at the beginning of the row
3) the handbag is crocheted from 8 squares of the same size.
4) You can choose any colors or crochet in one color. I crocheted from 8 unique squares.
square: 16 cm x 16 cm
THE SQUARE
R1: ch3 (dc), ch1, *(1dc in magic ring + ch1 )* repeat from * to * 11 times around. Close round with sl st in 3rd ch from beg. (12 dc + ch1 between them).
Cut the yarn and fasten off.
R2: ch3 (dc), 3dc in ch1sp, *(1dc in next st, 3dc in chsp)* repeat from * to * 11 times around. Close round with sl st in 3rd ch from beg. (12 x 4 dc = 48 dc around)
Cut the yarn and fasten off.
R3: work 4 stitches together: (ch3 + tr in next 3st), repeat *tr4tog + ch4* around, close round with sl st on top of 1st cluster(12 clusters and ch4 between them).
Cut the yarn and fasten off.
Make 4 corners
R4: ch1, (1sc + ch5 + 1sc) on top of first cluster = 1st corner chsp
ch5, *(1sc in next cluster top + ch5)* repeat from * to * 3 times along side
(1sc + ch5 + 1sc) on top of second cluster = 2nd corner chsp
ch5, *(1sc in next cluster top + ch5)* repeat from * to * 3 time along side
(1sc + ch5 + 1sc) on top of third cluster = 3rd corner chsp
ch5, *(1sc in next cluster top + ch5)* repeat from * to * 3 time along side
(1sc + ch5 + 1sc) on top of fourst cluster = 4st corner chsp
ch5, *(1sc in next cluster top + ch5)* repeat from * to * 3 time along side
Close round with sl st in 1st st at beg.
Cut the yarn and fasten off.
R5: ch1, (1sc + ch5 + 1sc) in corner chsp
ch5, *(1sc in next chsp)* repeat from * to * 4 times along side
**(1sc + ch5 + 1sc) in corner chsp + ch5, *(1sc in next chain sp + ch5)* repeat from * to * 4 times along side** repeat od ** do ** 3 times around.
Close round with sl st in 1st st at beg. Cut the yarn and fasten off.
R6: (ch3 (dc), dc, ch3, 2d) in corner chsp, 5dc in next 4 chain spaces,
**(2dc + ch3 + 2dc) in corner chsp, 5dc in next 4 chain spaces** repeat od ** do ** celkem 3 times around.
Close round with sl st in 3rd ch from beg.
Cut the yarn and fasten off.
R7: (ch1, 2sc, ch3, 2sc) in corner chsp, 1sc in next 20 st),
**(2sc + ch3 + 2sc) in corner chsp, 1sc in next 20 st** repeat od ** do ** 3 times around.
Close round with sl st in 1st st at beg.
Cut the yarn and fasten off.
Make 8 Squares
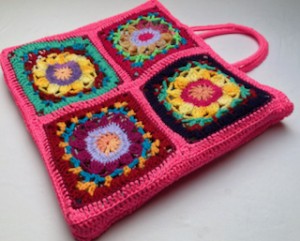
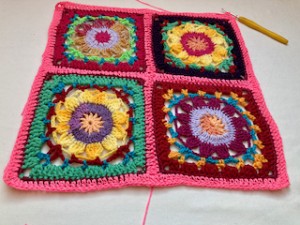
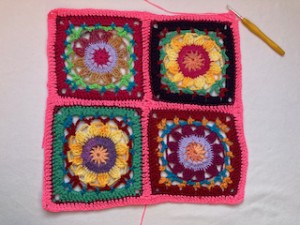
The 4 granny squares will be arranged to form one side of the bag. Arrange 8 squares as shown below.
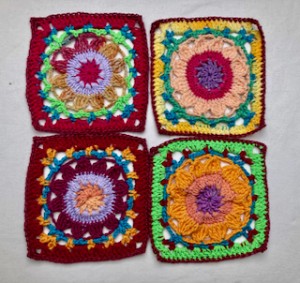
Place the squares next to each other like this 2x2 on the front part and 2x2 on the back part.
JOIN SQUARES
Crochet with the same hook.
Squares are wrong side up.
Join squares C1 and C2, then squares C3 and C4 as follows: rejoin a new yarn in the corner of the square.
Crochet double crochets: 1double crochet in corner chsp C1 and 1sl st in corner space C2, 1dc in corner space C1 and 1sl st in corner space C2, then continue crocheting stitch to stitch: 1dc in next st C1 and sl st in next st C2 until to the corner chain space, there we crochet 2 dc to joint he corners.
Join squares C3 and C4 in the same way.
Then join both rectangles: the rectangle (C1 and C2) with the rectangle (C3 and C4) as follows:
Join rectangles in the same way: rejoin a new yarn in the corner of the square.
Crochet double crochets: dc in corner chsp C1 and sl st into corner space C3, dc into corner space C1 and sl st into corner space C3, then continue crocheting dc and join st to st: dc in next st C1 and sl st in next st C3 until to the connection between the squares: there we crochet 2 dc around the double crochet.
We continue crocheting and join squares C2 and C4 in the same way: we crochet double crochets: double crochet in corner chsp C2 and sl st into corner space C4, dc into corner space C2 and sl st into corner space C4, then continue crocheting stitch to stitch: dc in next st C2 and after in next st C4 to the corner sp, there we crochet two dc.
Repeat the instruction to join squares C5, C6, C7 and C8.
SIDE OF FRONT / BACK PART
Turn the work to the wrong side and crochet with a row of double crochets.
We continue to crochet with the same yarn.
Crochet into the corner spaces: 2dc + ch3 + 2dc:
*(ch3 (dc), 1dc, ch3, 2dc) in corner chsp, 1dc into each dc up to the chain space * repeat from * to * a total of 4 times around.
Close the row with an invisible join.
Cut the yarn and fasten off.
SIDES AND BOTTOM OF THE BAG:
FRONT PART
We crochet with the same hook.
We crochet in rows back and forth.
Rejoin a new yarn in the corner, at the beginning of the ch3 (dc) row and crochet a double crochet into each dc from the previous row.
Crochet 2dc into the corner chain space.
Crochet 2 rows of double crochets.
BACK PART
Repeat the instructions above, on the back part I crocheted only 1 row of double crochets.
Now we have crocheted 2 parts - front and back part.
We crochet both parts together with slip stitches.
Ccrochet on the wrong side.
Crochet stitch to stitch.
FINISHING INSTRUCTIONS AND HANDLES
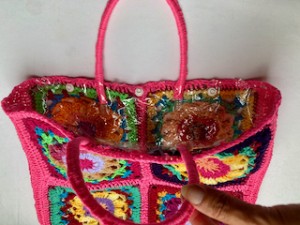
Put the plastic bag in the crocheted bag, crochet the HANDLES and sew the crocheted bag to the plastic bag.
HANDLES
Make single crochets around the plastic handles, so to cover the plastic perfectly, crochet the stitches right next to each other. Cut the yarn and fasten off.
Finally, we sew the crocheted cover to the plastic bag.
Check that the sides, bottom and also the buttons on the front and back fit well. There are 3 buttons on the plastic bag, the middle one goes into the join between the squares, you can match the position of the buttons on the sides accordingly.
And we're done! You've created a stunningly colorful bag! This amazing cover bag is not only super cool but also perfect for summertime fun! Add your personal touch with a label, button, crocheted flower, pendant, tassel, or any other decoration you like.
Enjoy fabulous days with this magically vibrant and cheerful bag! It's absolutely perfect for trips to the beach or pool! Dive into summer with style and color!
What’s Next?
Pin this post: Save this tutorial to your Pinterest boards so that you can come back to it later.
Leave a comment: I love to hear your feedback. Tell me in the comments below!
Share on Instagram and Facebook: When you make this project, share it on social media and tag me @sonanebeska. I love to see what you make!
More Crochet patterns? Check some of my favorite tutorials:
For even more crochet Home Decoration patterns, check out my collection.
I prepared a playlist:
or visit the web page:
All of the patterns on that list of beautifully designed, and suitable for both beginners and experienced crocheters. They are different levels of difficulties and techniques that you might have never seen before. Just click on them and you can find the free pattern, each of the patterns comes with a video tutorial.
Explore More Crochet Patterns
If you love to crochet as much as I do, I think you’ll love these other free crochet patterns.
♥♥♥
Have fun and let me know what you make. I would love to know how your project turns out.
Please don't forget to like and I really appreciate your comments.
If the pattern did not make sense to you, please don’t hesitate to contact me, I am happy to help :)
If you like this pattern, please follow and share my projects on social networks as a THANK YOU and to help me to create new projects and patterns for you.
If you pin my patterns to your Favorites and share it on social media as a link, I will be able to share a lot more free crochet patterns for you all.
Stay in touch at Facebook, Instagram and Pinterest.
Thank you very much once again for your visit and see you soon!
♥♥♥